Introduction:
Dynamics 365 was introduced with lots of useful new features and improvements over the previous versions. Editable grid is one of the most requested feature by Dynamics CRM users. Editable grid provides the ability to register events, so you can execute your business logic.
Let us explore this feature in detail:
You can register Data Events or UI Events as seen in the screenshot below;

Different events that can be registered are:
OnChange:
Similar to the OnChange event of the other controls, this event fires when the value of a cell in the grid is changed and you tab out of it. Note tab out is important for the event to fire. This event will also auto-fire when a setValue call is used to set the value of any column in the grid.
OnRecordSelect:
This will fire when the user moves across rows in the grid. This will not fire if you select multiple rows from the grid.
OnSave:
OnSave automatically triggers on the following
- Save button on the editable grid is explicitly clicked.
- You navigate across rows in the grid.
- Any action like sort, filter, grouping that causes the grid to reload/refresh.
Example using Onchange:
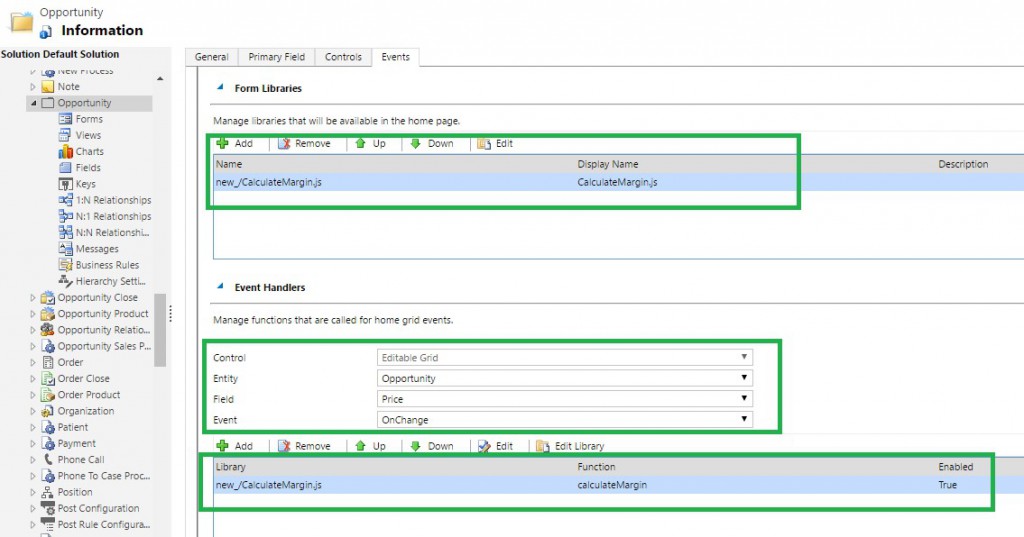
We can use JavaScript to perform a business logic. Suppose we have a requirement to calculate the margin % and set it into the margin field in Opportunity. We have developed the JavaScript and added on the form. To achieve the same in Editable grid, we have to register the JavaScript, OnChange of the Price and Cost fields. Now, when the user sets or updates the Price or Cost, then our script will fire, calculate the margin and populate it into the margin field of Opportunity.
In the below screenshot, we have added the required scripts and registered the Price and Cost field OnChange event;
The code to achieve this functionality is mentioned below;
function calculateMargin() {
    var selectedRow = null;
    var attributeColl = null;
    var price;
    var cost;
    var margin;

    try {

        //get the selected rows - use the getControl method and pass the grid name.
        selectedRow = Xrm.Page.getControl("crmGrid").getGrid().getSelectedRows();

        //loop through rows and get the attribute collection
        selectedRow.forEach(function (row, rowIndex) {

            //get the attribute Collection
            attributeColl = row.getData().getEntity().attributes;

            //loop through attribute Collection and do the calculation and set the
            attributeColl.forEach(function (att, attIndex) {

                switch (att.getName()) {
                    case "new_price":
                        //get the value of price
                        if (att.getValue() != null && att.getValue() != 'undefined') {
                            price = parseFloat(att.getValue());
                        }
                        break;
                    case "new_cost":
                        //get the value of cost
                        if (att.getValue() != null && att.getValue() != 'undefined') {
                            cost = parseFloat(att.getValue());
                        }
                        break;

                    case "new_margin":

                        //calculate the margin
                        margin = parseFloat([(price - cost) / cost]) * 100;

                        //set the margin value
                        if(margin != "NaN") {
                            att.setValue(margin);

                            //get the margin control to set it as read only.
                            var marginControl = att.controls;

                            marginControl.forEach(function (ctl, attIndex) {
                                ctl.setDisabled(true);
                            });
                        }

                        if (margin < 0) {
                            Xrm.Utility.alertDialog("Cost should not be more than Price");
                        }
                        break;
                }

            });
        });
    } catch (e) {
        Xrm.Utility.alertDialog(e.message);
    }
}
When user updates the price or cost, then the margin will auto populate as shown in below screenshot.
Example using OnRecordSelect
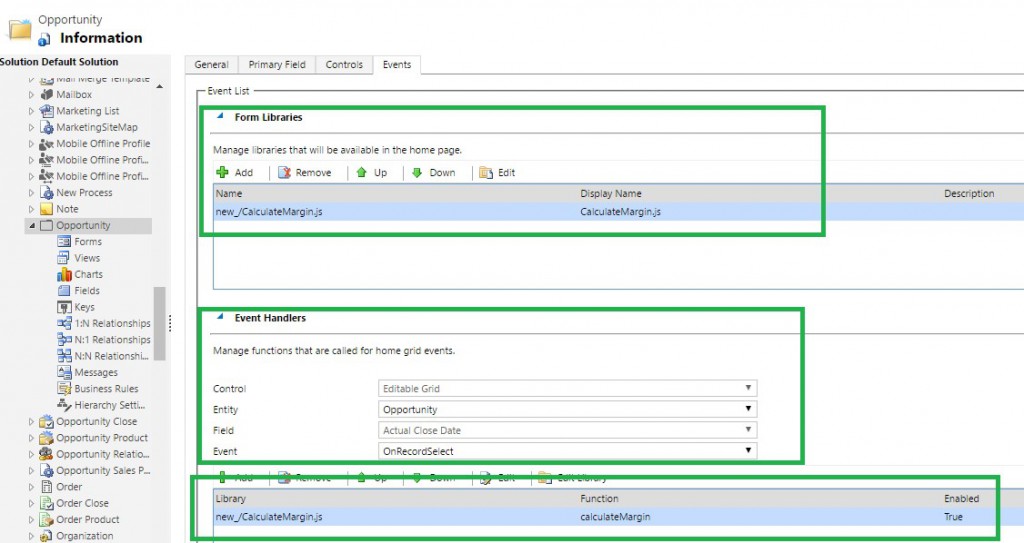
We have another requirement where if the Margin is less than ‘0’ then we want to alert the user. To achieve this, we developed the script and registered OnRecordSelect event as shown in below screenshot.
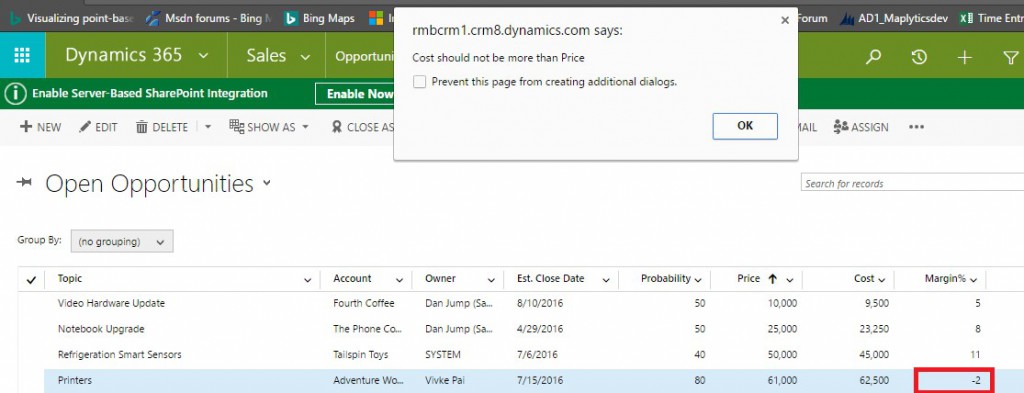
When the user selects the grid row, the script will fire if the margin is less than ‘0’ and it shows an alert, as shown in the below screenshot.
Note: If we have a business rule associated with the cost and price field, they would be executed as well.
Conclusion:
Editable grids in Dynamics 365 enable users to edit the data, right in the grid, with few clicks! Events in editable grids add to the functionality of this feature.
Cut short 90% of your manual work and repetitive data entry!
Get 1 Click apps and say goodbye to all repetitive data entry in CRM –
Click2Clone – Clone/Copy Dynamics 365 CRM records in 1 Click
Click2Export – Export Dynamics 365 CRM Report/CRM Views/Word/Excel template in 1 Click
Click2Undo – Undo & Restore Dynamics 365 CRM data in 1 Click


Hello Inogic,
how can we get the parent record id from the subgird formContext as Xrm.Page got deprecated.
Thanks in Advance.
Viswa
You can check ‘Pass execution context as first parameter’ while adding event for editable subgrid as shown below. In this way, you will get the formContext as first parameter in your function in script. You can now use formContext parameter in your script.
Thanks!
Hello Inogic,
In my entity the Event tab doesn’t appear. I searched everywhere and didn’t find anything. Could you help me with that?
Thanks!
Hi,
To see the “Event” tab, first you need to add the Editable grid control on the entity. Once the editable grid is configured with your entity then you can see the “Event” tab.
Please find the below URL for details steps to add editable grid.
https://docs.microsoft.com/en-us/dynamics365/customerengagement/on-premises/customize/make-grids-lists-editable-custom-control?view=op-9-1
Thanks.