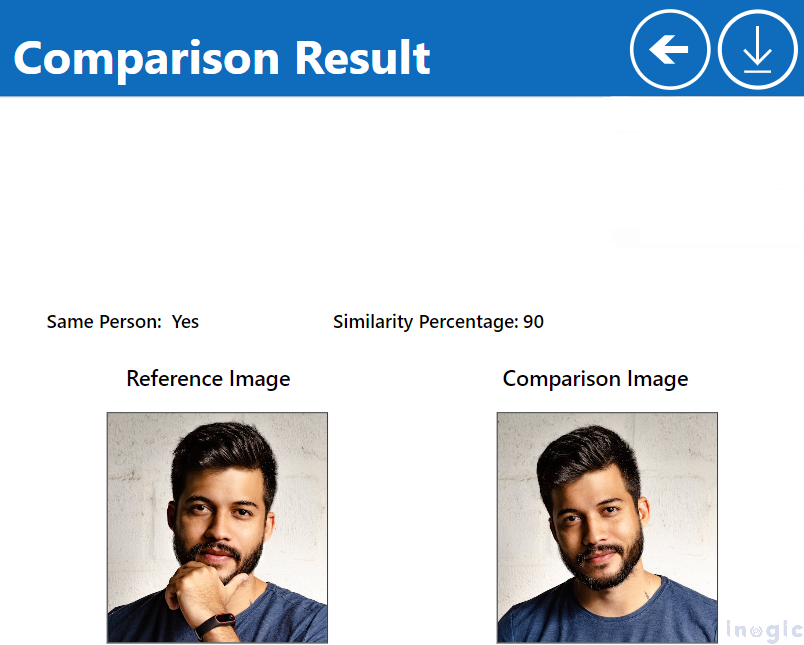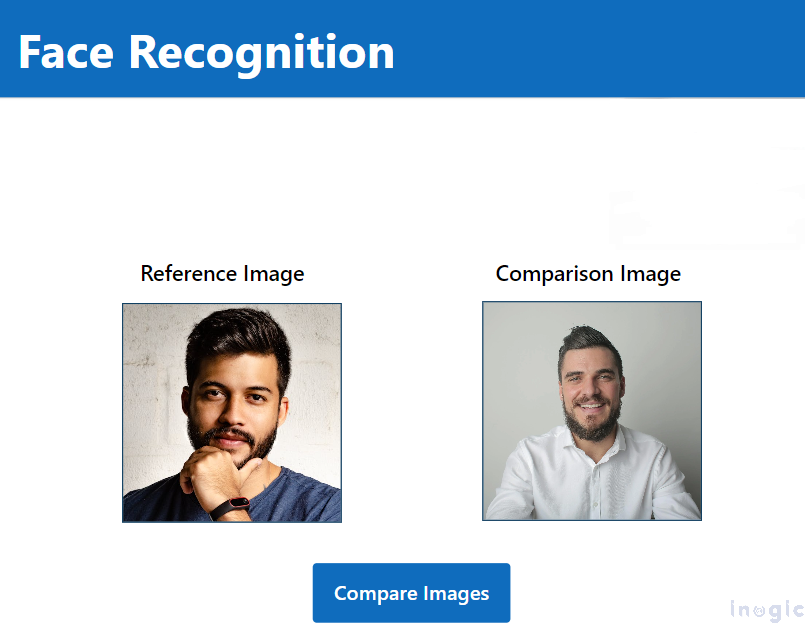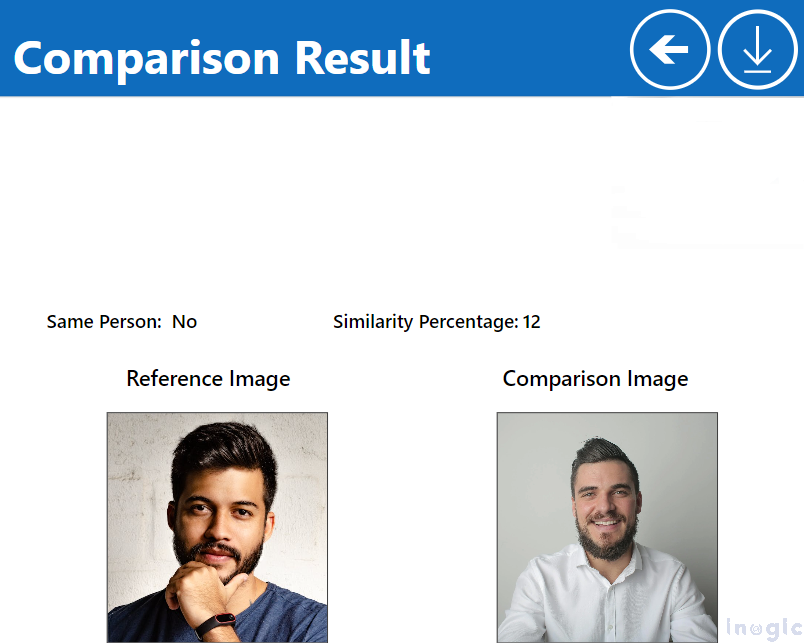
In today’s digital age, integrating advanced facial recognition capabilities into applications has become increasingly important for various purposes such as security, identification, and user authentication. Azure Face API provides a robust suite of services enabling developers to incorporate functionalities like face detection, face verification, and emotion recognition into their applications.
Recently, we faced a requirement to compare two uploaded images and determine the similarity percentage, along with verifying if the faces in the photos belong to the same person. The primary goal was to ensure accurate detection and identification of faces in the uploaded images, yielding precise comparison results.
In this blog post, we will explore how to leverage the Azure Face API service within Power Automate flow and Canvas App to achieve this requirement. The following steps will guide you through the process of creating an automated flow that validates inputs, detects faces, retrieves face IDs, verifies faces, and ultimately provides a comparison result.
Step 1: Create an Automated Flow
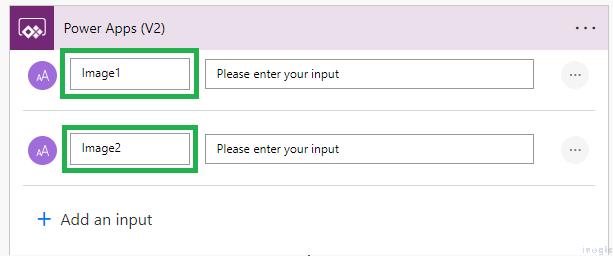
Create an Automated flow with the trigger Power Apps(V2). Add two inputs to receive the uploaded images as shown below.
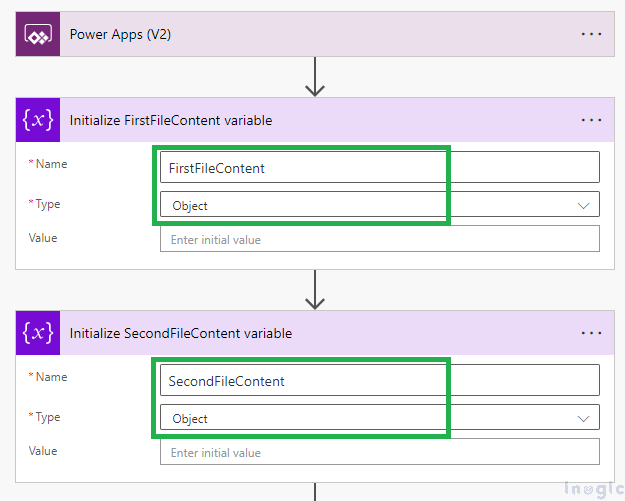
Step 2: Initialize Two Object Variables
Add the ‘Initialize variable’ action in Power Automate to store the content of the first and second images for further use.
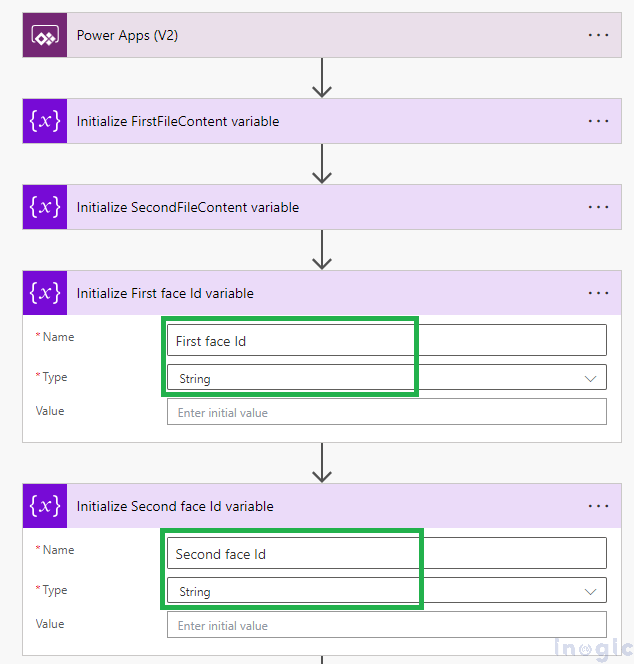
Step 3: Initialize Two String Variables
Add the ‘Initialize variable’ action in Power Automate to store the face IDs for the first and second faces for further use.
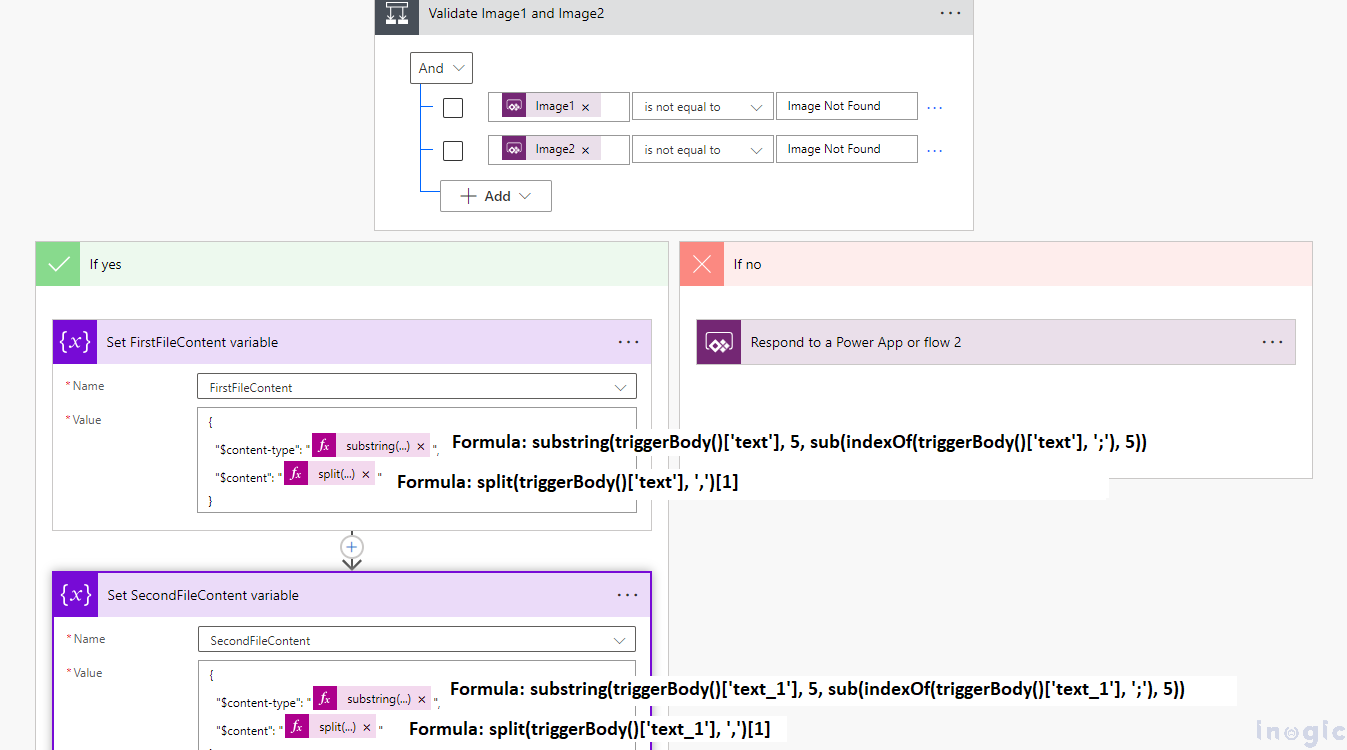
Step 4: Validate the inputs
In Power Automate, add the ‘Condition’ action to check the inputs received from Power Apps (V2). This action helps ensure that the images uploaded through the Canvas App are properly validated. Within the ‘Condition’ action, set the values of the ‘FirstFileContent’ and ‘SecondFileContent’ variables based on the received inputs.
Expressions from the above image:
- substring(triggerBody()[‘text’], 5, sub(indexOf(triggerBody()[‘text’], ‘;’), 5))
- split(triggerBody()[‘text’], ‘,’)[1]
- substring(triggerBody()[‘text_1’], 5, sub(indexOf(triggerBody()[‘text’], ‘;’), 5))
- split(triggerBody()[‘text_1’], ‘,’)[1]
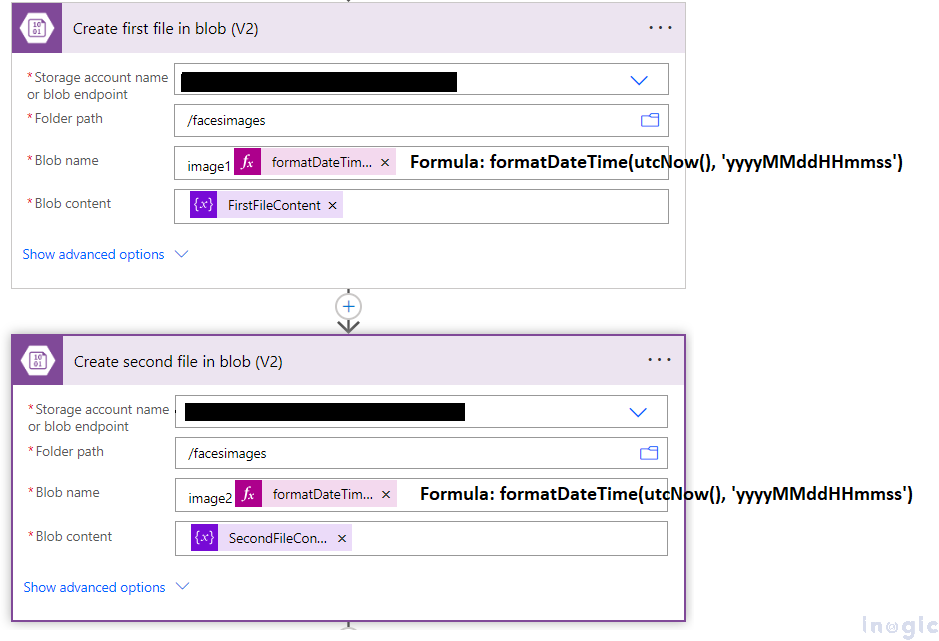
Step 5: Create files in Blob Storage
Add the ‘Create blob (V2)’ action to create image files in Azure Blob Storage using the images provided by Power Apps. These files will be stored in Azure Storage for further use.
Expressions from the above image:
- formatDateTime(utcNow(), ‘yyyyMMddHHmmss’)
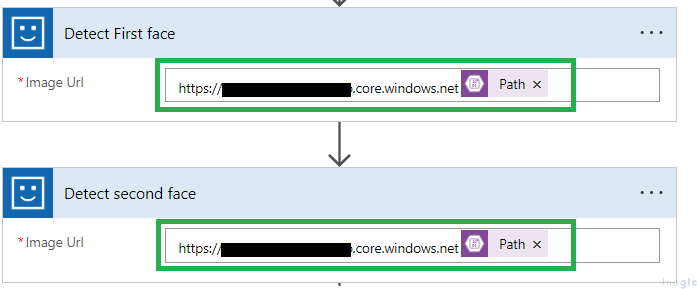
Step 6: Detect Face
Add the ‘Detect faces’ action in Power Automate to identify faces within the images sent from Power Apps. For this action, use the image URL generated from the blob storage in the previous steps as the input.
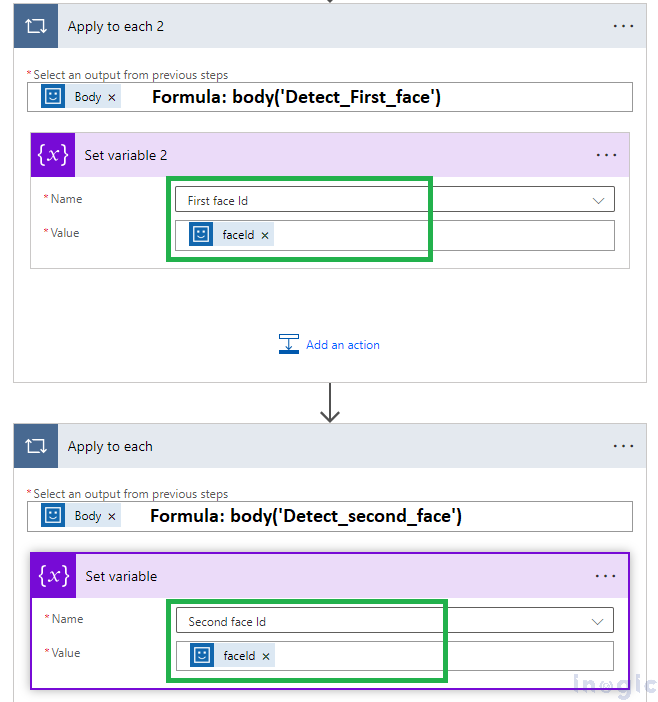
Step 7: Get Face ID
Now, Add the ‘Apply to Each’ action in Power Automate to iterate through the detected faces in both images. Within this action, include a ‘Set variable’ action to capture the Face IDs for both images.
Expressions from the above image:
- body(‘Detect_First_face’)
- body(‘Detect_second_face’)
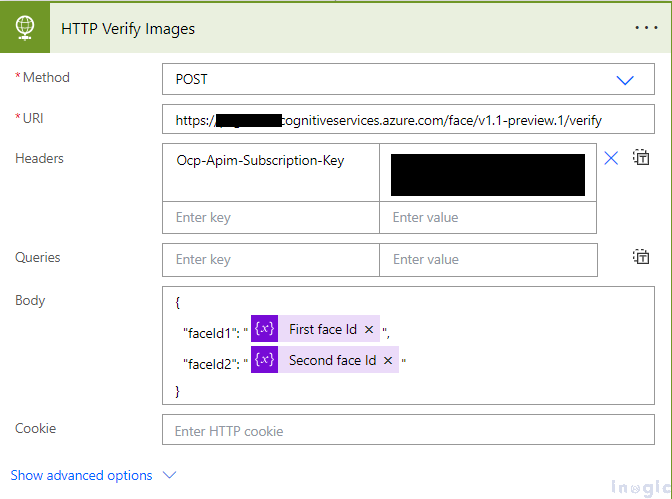
Step 8: Verify Face
For this, Add the ‘HTTP’ action in Power Automate to invoke the Face API and verify the face. Provide the API endpoint and append the URI as shown in the screenshot. Include the access key in the request header and pass the Face IDs in the request body, as demonstrated in the image.
Step 9: Get Confidence
Add the ‘Parse JSON’ action to parse the output of the above HTTP action and get the confidence.
JSON Schema:
{
    type: object,
    properties: {
        isIdentical: {
            type: boolean
        },
        confidence: {
            type: [
                integer,
                number
            ]
        }
    }
}
Step 10: Respond to the Canvas App
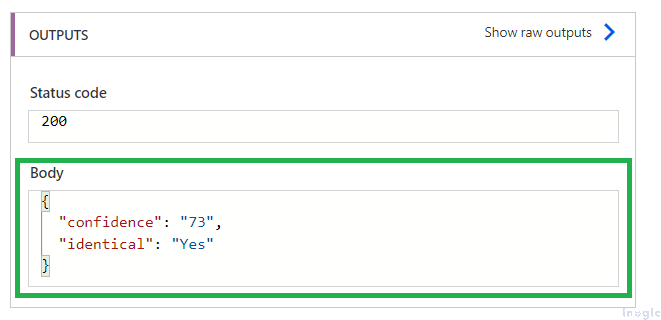
Add the ‘Respond to a Power App or flow’ action to send the Confidence and isIdentical to the Canvas App.
Expressions from the above image:
- formatNumber(mul(100, float(body(‘Parse_JSON’)?[‘confidence’])),’#0′)
- if(equals(body(‘Parse_JSON’)?[‘isIdentical’], true), ‘Yes’, ‘No’)
Step 11: Create the required canvas app
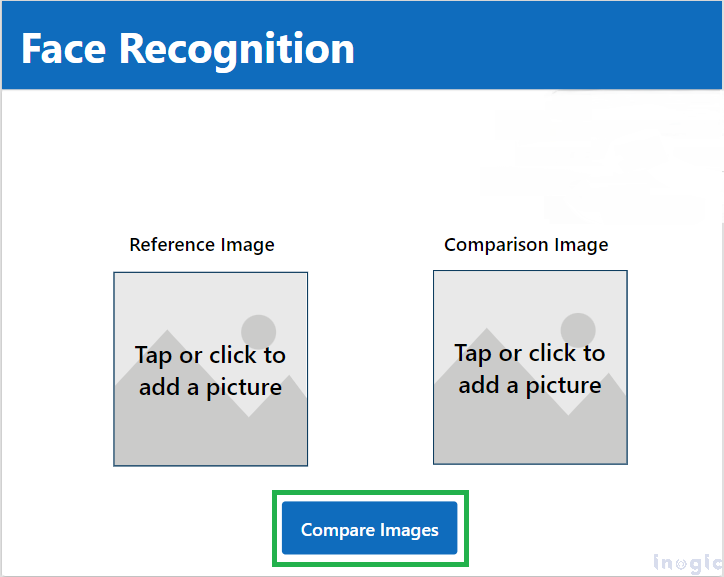
Develop a Canvas App with two controls AddMediaWithImage to upload Reference and Comparison images and a button to initiate the comparison process.
Add the following formula to the onSelect() property of the Compare Images button. This formula triggers the execution Compare uploaded face images to get face matching accuracy Power Automate Flow upon button click. The Power Automate Flow accepts two input values, which are passed as JSON (the uploaded images). If an image is not uploaded, it passes Image Not Found.
Set(
    RecoginzationVar,
    Compareuploadedfaceimagestogetfacematchingaccuracy.Run(
        If(
            IsBlank(AddMediaButton1.Media),
            Image Not Found,
            Substitute(
                JSON(
                    UploadedImage1.Image,
                    JSONFormat.IncludeBinaryData
                ),
                ,

            )
        ),
        If(
            IsBlank(AddMediaButton2.Media),
            Image Not Found,
            Substitute(
                JSON(
                    UploadedImage2.Image,
                    JSONFormat.IncludeBinaryData
                ),
                ,

            )
        )
    )
);
If(
    IsBlank(RecoginzationVar.confidence),
    Notify(
        Please Upload Face Images,
        NotificationType.Error
    ),
    Navigate(ComparisonsResult);
);
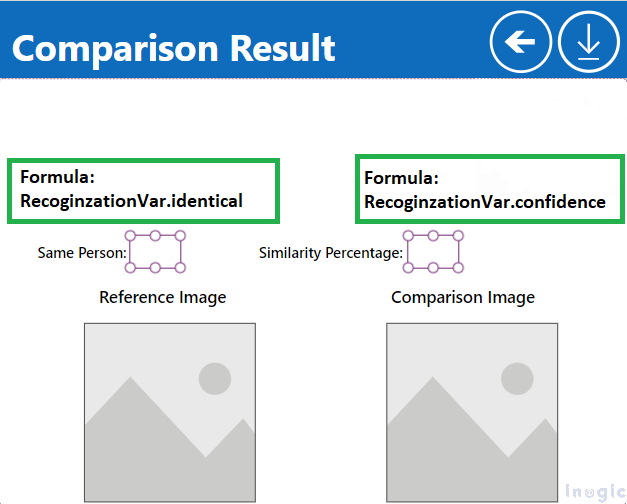
Step 12: Add Comparison Result screen
Add a screen to show comparison results.
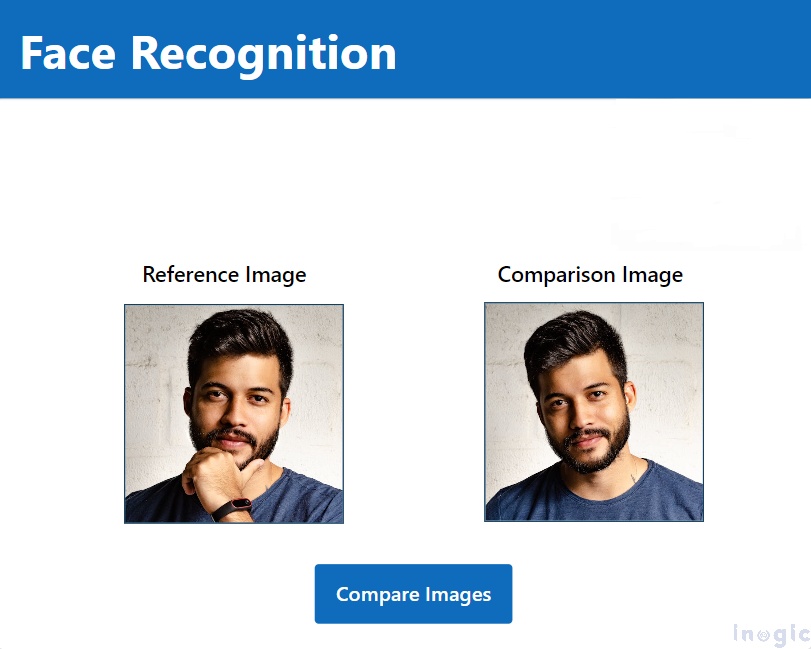
Below is the output.
Conclusion:
By integrating Azure Face API within Power Automate flow and Canvas App, you can efficiently and accurately compare two uploaded images to determine the similarity percentage and verify if the faces in the images are the same. This process harnesses the advanced facial recognition capabilities of Azure Face API, which includes face detection, verification, and emotion recognition. Following the outlined steps ensures a smooth and precise implementation, allowing developers to leverage these powerful tools for enhanced facial matching accuracy in various applications. Whether for security, identification, or other use cases, this approach provides a reliable and automated solution for face-matching requirements.
Step into the future of app development with our Copilot-enabled Power Platform solutions, Azure OpenAI Sales Companions, and Copilot Studio Developments. Contact crm@inogic.com to unlock business success with AI integration.
