The Field Service Mobile app helps organizations to deliver services to customer locations. It provides the ability to work on the Bookings by the Technician i.e. Bookable Resource.
This application includes various features to automate the process so that technicians can work efficiently and flawlessly. In this blog, we will walk through the ability to dynamically filter the lookup in the Field Service Mobile app using updateLinkItemViews function.
Consider this example: we have to filter out Company Name lookup on Contact based on City field value. Therefore, whenever the City on the Contact form is updated, Company Name lookup should be filtered out with the Accounts containing City as City of the Contact record.
Please find the below steps to follow to achieve our considered request:
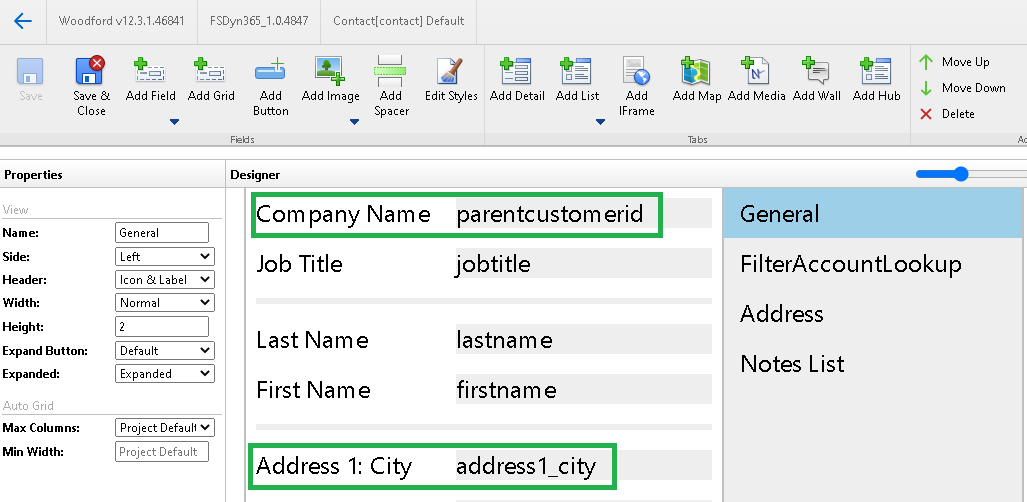
- Customize contact form to include the Company Name (parentcustomerid) and City fields as shown in the below screenshot.
- Add HTML and script within Offline HTML section, this includes the logic to bind the dynamic filters to the lookup on the form.
AccountFilter.HTML: This html includes reference to the Javascript file as we can add only HTML file on the form. Below is the code snippet for the same.<!DOCTYPE html>
<html xmlns=”http://www.w3.org/1999/xhtml”>
<head>
<title></title>
<script type=”text/javascript” src=”JSBridge.js”></script>
<script type=”text/javascript” src=”JSBridgeExtension.js”></script>
<script type=”text/javascript” src=”Schema.js”></script>
<script type=”text/javascript” src=”Common.js”></script>
<script type=”text/javascript” src=”Enums.js”></script>
<script type=”text/javascript” src=”Telemetry.js”></script>
<script type=”text/javascript” src=”FilterAccount.js” ></script>
</head>
<body onload=”AccountFilter();”>
</body>
</html>
FilterAccount.js: This includes the business logic for filtering the Company Name lookup based on the City value entered on the Contact Form. Below is the code snippet for the same.
function AccountFilter() {
try {
// Change the parent customer on currently edited contact entity
MobileCRM.UI.EntityForm.onChange(function (entityForm) {
if (entityForm.context.changedItem != “address1_city”) return;
MobileCRM.UI.EntityForm.requestObject(function (entityForm) {
// Take detail view with name “General”
var detailsView = entityForm.getDetailView(“General”);
var inlineSetup = new MobileCRM.UI.DetailViewItems.LookupSetup();
var City = entityForm.entity.properties.address1_city;
inlineSetup.addView(“account”, “Default”, true);
// Alternatively, specify the explicit fetch XML filter for inline lookup
inlineSetup.addFilter(“account”, ‘<fetch version=”1.0″><entity name=”account”><attribute name=”name” /><attribute name=”primarycontactid” /><attribute name=”telephone1″ /><attribute name=”accountid” /><order attribute=”name” descending=”false” /><filter type=”and <condition attribute=”address1_city” operator=”eq” value=”‘ + City + ‘” /> <condition attribute=”statecode” operator=”eq” value=”0″ /></filter></entity></fetch>’);
dialogSetup = new MobileCRM.UI.DetailViewItems.LookupSetup();
dialogSetup.addView(“account”, “Default”, true); // Set “Default” view for expanded lookup form
dialogSetup.addFilter(“account”, ‘<fetch version=”1.0″><entity name=”account”><attribute name=”name” /><attribute name=”primarycontactid” /><attribute name=”telephone1″ /><attribute name=”accountid” /><order attribute=”name” descending=”false” /><filter type=”and <condition attribute=”address1_city” operator=”eq” value=”‘ + City + ‘” /> <condition attribute=”statecode” operator=”eq” value=”0″ /></filter></entity></fetch>’);
dialogOnly = false; // Allow both inline lookup and expanded lookup dialog
// Allow both inline lookup and expanded lookup dialog
detailsView.updateLinkItemViews(0, dialogSetup, inlineSetup, dialogOnly);
}, null, null);
},
function (error) {
MobileCRM.bridge.alert(“An error occurred: ” + error);
},null); }
catch (err) {
MobileCRM.bridge.alert(err);
}
}
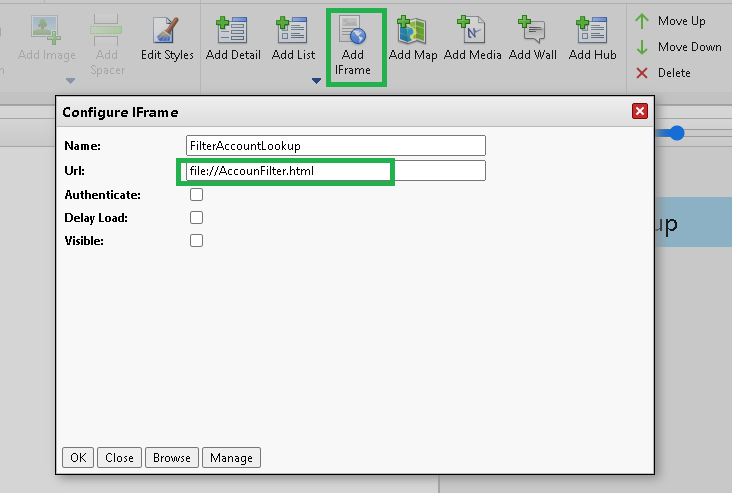
- Once completed with adding offline html, we need to include the AccountFilter.html file on the Contact Form by adding an Iframe as shown in the below screenshot.
- Save and close the form and Publish the Mobile project to reflect the customizations in the Field Service Mobile App.
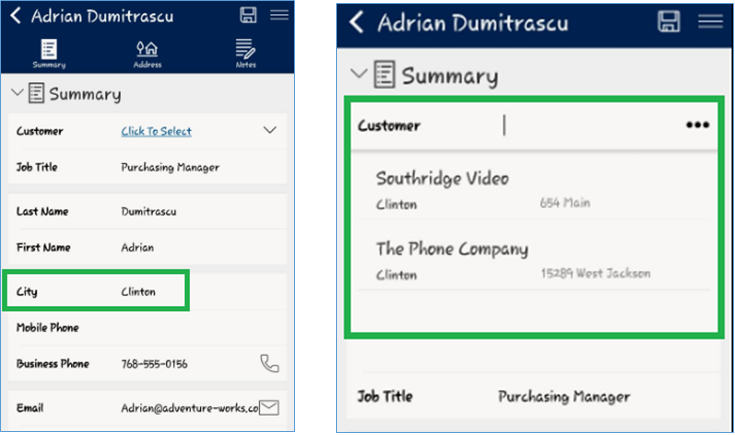
- Now Sync the Field Service Mobile app and navigate to the Contact record. Change the City on the contact and click on the Company Name lookup. This will filter and display the accounts containing the City as that of the City of the contact.As shown in the below screenshot, we have added City as Clinton then the Company Name lookup will filter the accounts containing the City as Clinton.
Conclusion
Field Service provides us the flexibility to achieve our business requirements by filtering lookups using updateLinkItemViews function within Field Service Mobile App.
Need any help with Microsoft Dynamics 365 Field Service module / Microsoft CRM / Power Platform development?
Want to manage your field services portal more effectively? Contact us at crm@inogic.com and our Inogic- Professional Services Division will help you modify, optimize, and automate all our requirements within Microsoft Dynamics 365 Field Service!
Happy Servicing!


