
Power Pages is a component of Microsoft’s Power Platform, designed to enable users to build, manage, and host modern, secure, and responsive business websites with minimal coding. It integrates seamlessly with other Power Platform tools like Power Automate, Power Apps, and Microsoft Dataverse, providing a comprehensive suite for developing and deploying business solutions.
Let’s consider a scenario as Employee Portal Document Verification, this will include a feature that ensures that employees only upload the correct type of document for each category. For example, when an employee needs to upload their Passport, the system validates the upload to prevent incorrect documents, such as credit cards or unrelated IDs, from being attached. This robust validation process ensures the integrity and accuracy of document submissions, making sure all uploaded files are relevant and correctly classified.
We’ll initiate the validation process for Passports by checking for adherence to prescribed formatting standards while ensuring the accuracy of essential data. Additionally, you can extend with purpose-built APIs tailored for authenticating Passport Numbers can further augment this validation process.
Follow the below steps to Validate the Document in Power Pages
Step 1: Design an AI module to check the Passport format and extract details.
- Navigate to the AI Modals within the Power Apps.
- Select Model Type: Choose “Document Processing” as the type of AI model.
- Choose Document Type: We have selected the “Fixed Templates Documents”.
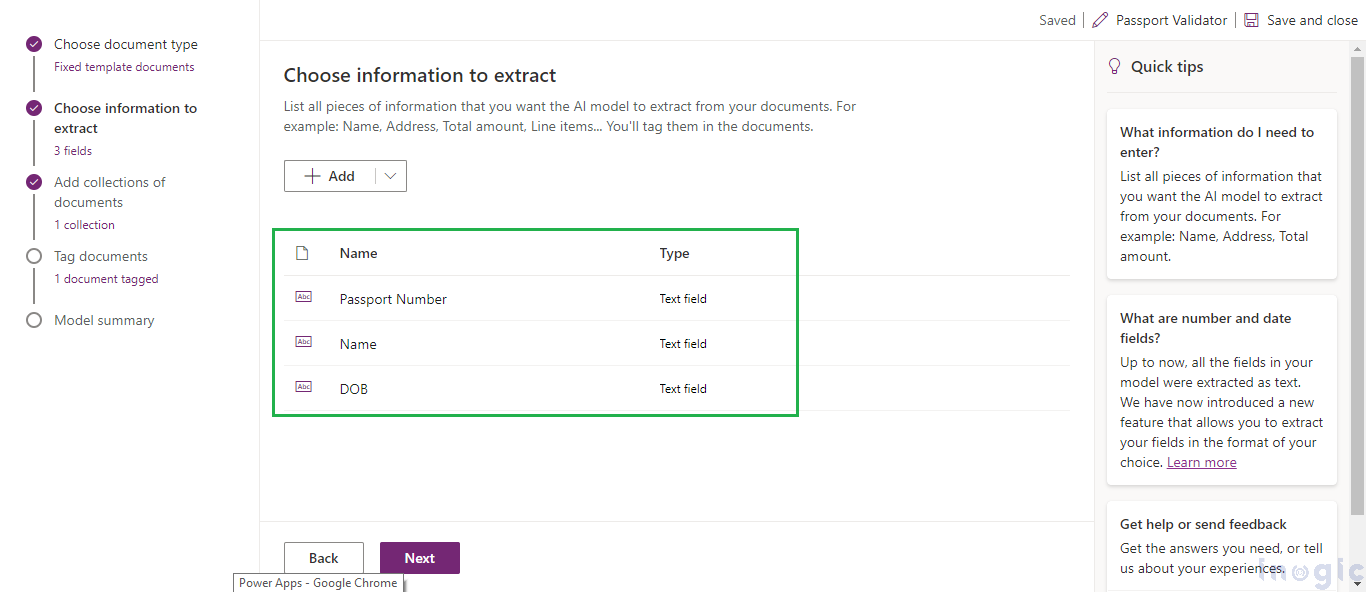
- Choose information to extract as shown in the below screenshot.
-
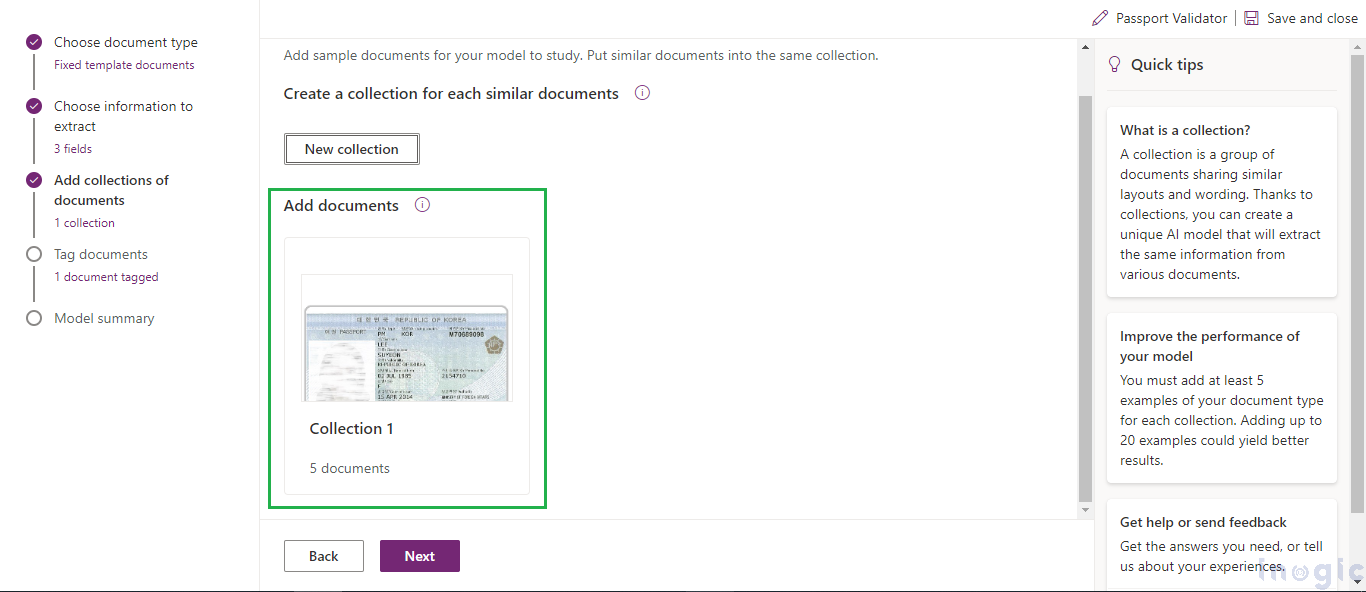
- Add Collections of Documents: We have added a single collection with 5 Passport Card samples to train the AI Builder Model.
6. Tag the information: Map all the variables created to their data (e.g., Name, Passport Number, Date of Birth and You can add other data as well).

- Train the Model: After tagging all necessary fields, initiate the training process. Click “Train” to allow AI Builder to process the documents and learn the patterns.
- Test with New Documents: Upload new Passport documents that were not part of the training set to test the model’s accuracy.
- Publish: Once satisfied with the model’s accuracy, publish it so it can be used in your Power Automate Flows.
Step 2: Integrate this module with Power Automate Flow for real-time validation.
- Access Power Automate: Navigate to the Power Automate portal.
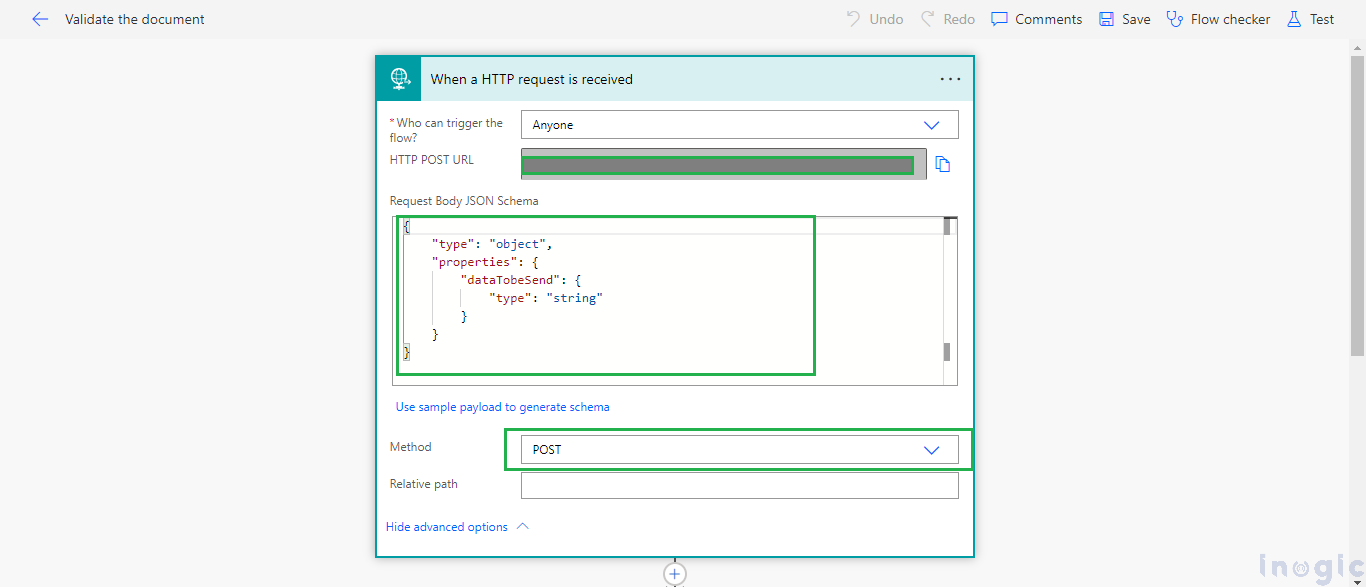
- Trigger the flow by the “When an HTTP Request is received”. Note that the HTTP post URL only gets generated once you save the flow.

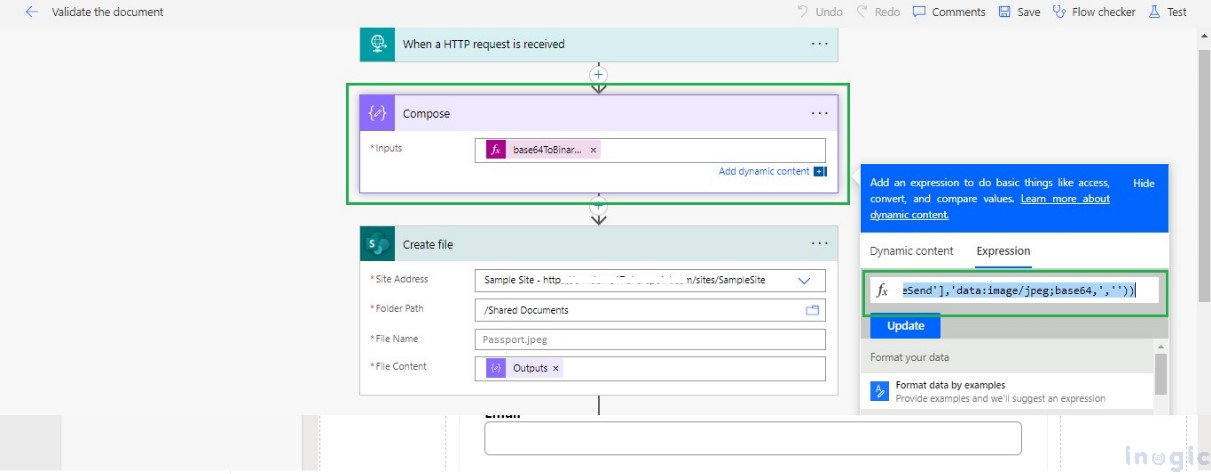
- In the next step, we create a file from the base64 data received by the Power Automate Flow from the Power Pages Document Form. To convert the base64 data into a binary format suitable for file creation, we use the following expression:
base64ToBinary(replace(triggerBody()?[‘dataTobeSend’],’data:image/jpeg;base64,’,”))
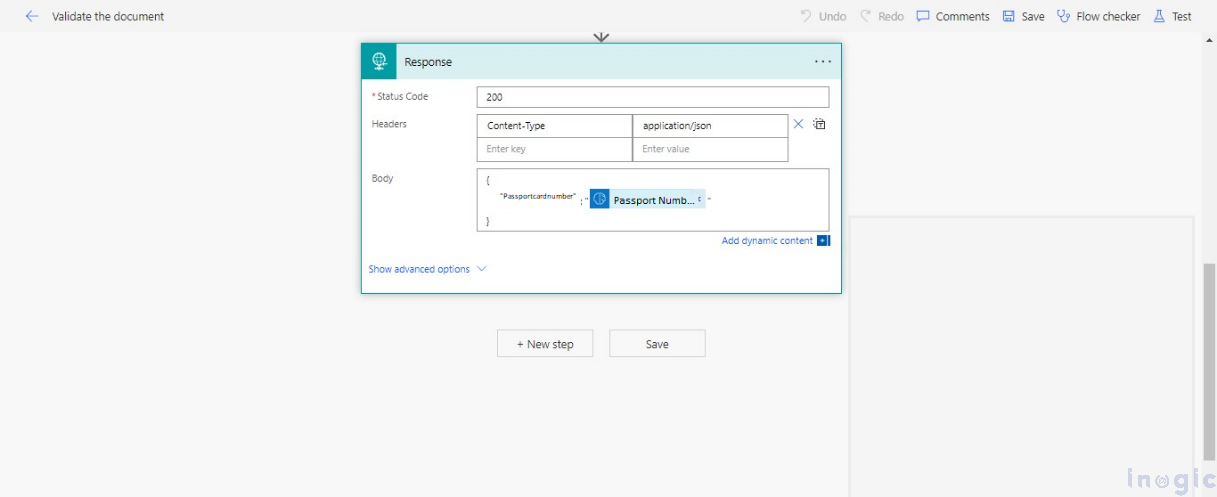
4. Once the File is created we can use our AI modal to check whether the card is either a Passport card or any other invalid card, thereafter AI modal will return outputs such as Name, Passport Number, and Date of Birth. You can extend the validation in flow as well, with more advanced checks.
5. Now we will send the response to the Requester on the power pages,
Step 3: Implement the document upload and validation process in Power Pages.
- Consider, that we have a Power Pages Sample Site with a Document Page integrated within the site with the Sample Document Verification form to get the Employee’s Documents verified.
- So, we will need to add a custom code to trigger the power automate flow which will verify the uploaded documents based on the AI Builder model we trained in previous steps.
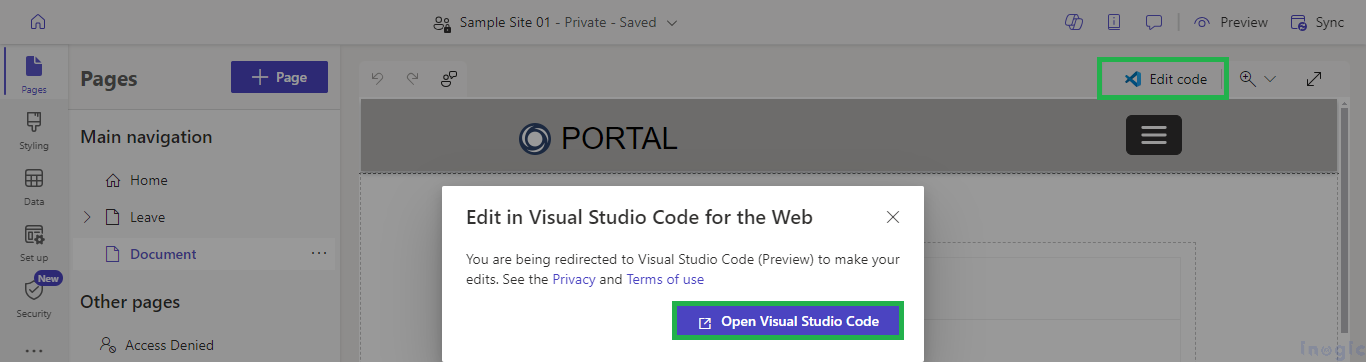
- To add the custom scripts to the Power Pages, Navigate to the Power Pages design studio for the respective Power Pages Site.
- Look for the Edit Code From the document page and click on the Open Visual Studio Code, you will be redirected to the Visual Studio on the web itself for that specific page.
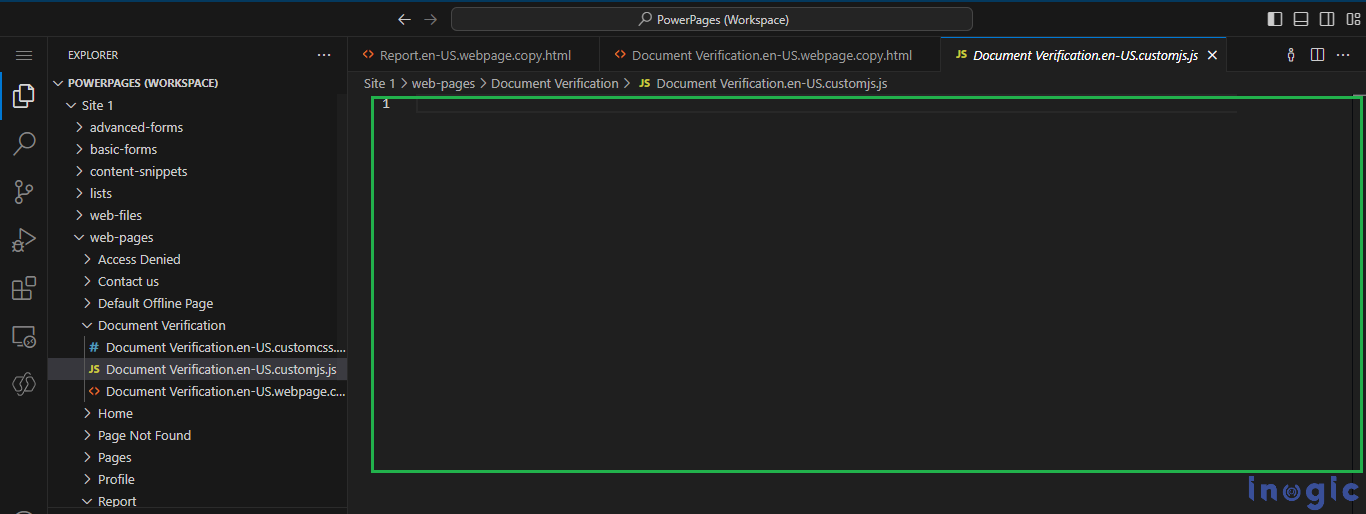
- Now, Click on Sync within Power Pages Designer Studio to reflect the changes.

- You will be able to see the 3 files for the Targeted web page, HTML, CSS, and JS
- You can add the custom code in the JavaScript file as shown in the below screenshot,
- The below Functions are currently encapsulated for Passport cards only.
- We are triggering the flow from the Power Pages within ”XMLHttpRequest()”. The whole HTTP Request functionality is wrapped into a function called “sendDocumentToFlow()” In this function, we are sending the base64 data of the attached document.
- We have utilized on change function of the input file, which on change hits the “sendDocumentToFlow()” and gets the response from the flow.
- Flow response contains the Passport card number which further can be validated.
- For now, we have validated with a few validation aspects such as,
- The first character cannot be Q, X, or Z
- The first and last digits should not be 0
- Please find the below Code snippets for the same,
$(document).ready(() => {
    $("#cr62d_passportcard_input_file").change(async (e) => {
        $(".verifiedAd").remove();
        let fileInput = e.currentTarget.files[0];
        if (fileInput != null) {
            try {
                let reader = new FileReader();
                reader.onload = async function (f) {
                    let base64DataFile = f.target.result;
                    let httpResponse = await sendDocumentToFlow(base64DataFile);
                    httpResponse = JSON.parse(httpResponse)
                    PassportcardNum = httpResponse['passportcardnumber'];
                    if (validatePassport(PassportcardNum)) {
                        if ($(".verifiedAd").length == 0) {
                            let verifiedAd = '✅'
                            $(verifiedAd).appendTo(".container-filelink-delete.file-link-and-delete");
                        }
                    } else {
                        console.error("Invalid Passport Card detected");
                        $("#cr62d_passportcard_delete_button").click();
                        $(".verifiedAd").remove();
                        alert("Please upload a valid Passport document.");
                    }
                };
                reader.readAsDataURL(fileInput); // Ensure to call readAsDataURL to trigger onload
            } catch (err) {
                console.error(err.message);
            }
        }
    });

    async function sendDocumentToFlow(filedata) {
        return new Promise((resolve, reject) => {
            const url = 'Paste your URL here';
            const inputData = JSON.stringify({ dataTobeSend: filedata });
            const xhr = new XMLHttpRequest();
            xhr.open("POST", url, true);
            xhr.setRequestHeader('Content-Type', 'application/json');
            xhr.onreadystatechange = function () {
                if (xhr.readyState === 4) {
                    if (xhr.status === 200) {
                        resolve(xhr.responseText);
                    } else {
                        console.error('Request failed:', xhr.status, xhr.statusText);
                        console.error('Response:', xhr.responseText);
                        reject(new Error(`Error: ${xhr.status} ${xhr.statusText}`));
                    }
                }
            };
            xhr.ontimeout = function () {
                reject(new Error('Request timed out'));
            };
            xhr.onerror = function () {
                reject(new Error('Network error'));
            };
            xhr.send(inputData);
        });
    }

    $("#cr62d_passportcard_delete_button").click(()=>{
        $(".verifiedAd").remove();
    })

    // Passport Card validation
    function validatePassport(PassportCard) {
        PassportCard = PassportCard.trim().replaceAll(" ", "");
        var regex = new RegExp("^[A-PR-WY][1-9][0-9]{7}[1-9]$");
        return regex.test(PassportCard);
    }

})
- Save and Sync the Power Pages Site.
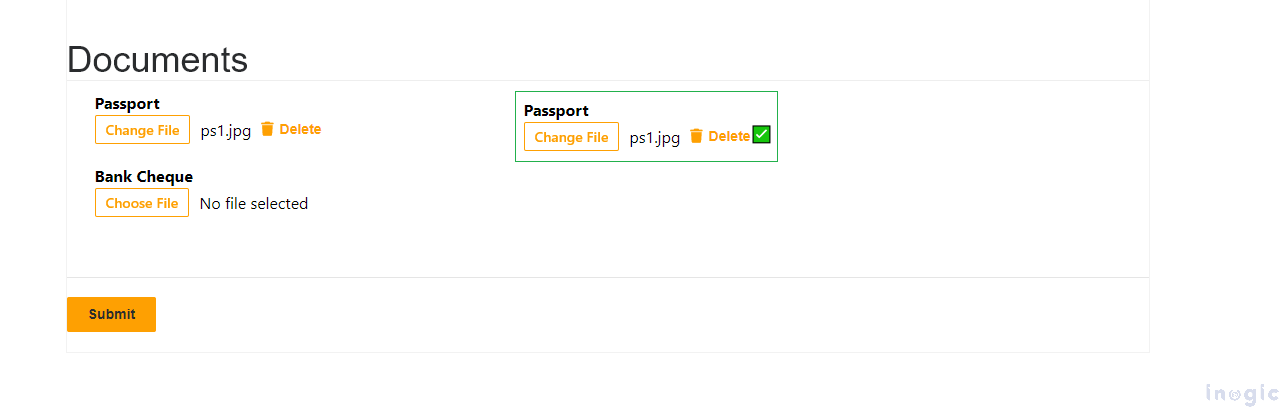
Now Let’s test the functionality, by attaching the Sample Passport card.
We are accepting the IMG types only, you can extend this with other extensions.
When the document is attached to the input, it will take a few seconds to verify whether the card is either valid or invalid, If the Card is valid then will show a Marking icon as validated, or else it will remove the document from the input control and alert the user as “Please upload a valid Passport document.”.
Valid Test: Please Refer to the screenshot given below.
Invalid Test: Please refer to the screenshot given below.
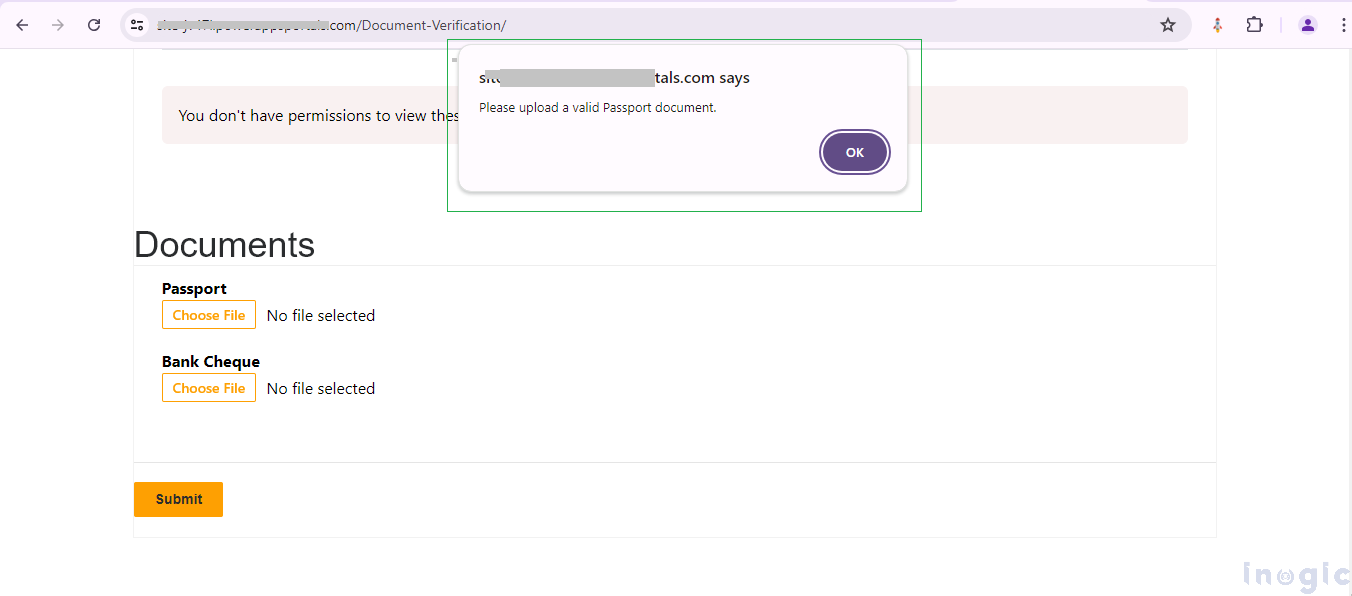
For this, we have uploaded a sample Credit card instead of a Passport Card Document.
Conclusion:
In this way, we can use the AI Builder Model to be integrated with Power Automate flow and used to add validation constraints on the Power Pages Portal. This real-time validation provides quick and reliable feedback to employees, improving the efficiency, accuracy, and security of our document verification system.