Introduction
Sales forecasting has introduced few interesting features and one of them is Advanced Scheduling. Previously while configuring the forecast there was only a scheduling option available in the general tab of sales forecast, but now there is flexibility to configure the scheduling as per the calendar format that organizations use.
For example: If you have a quarter of 13 weeks then you can divide/group the quarter either as “4-4-5”, “5-4-4” or “4-5-4”, it is purely depending upon your organization’s timeframe requirement. This is where “Advanced Scheduling” feature comes into the picture.
In the previous blog, we have already seen Enhanced configuration steps for Sales Forecasting. In this blog let’s have quick look at “Advanced Scheduling” feature.
Previously under the scheduling option, there were no preview page available for scheduled periods but now in Advanced Scheduling preview page is available to display the scheduled periods as shown below:
Advanced Scheduling:
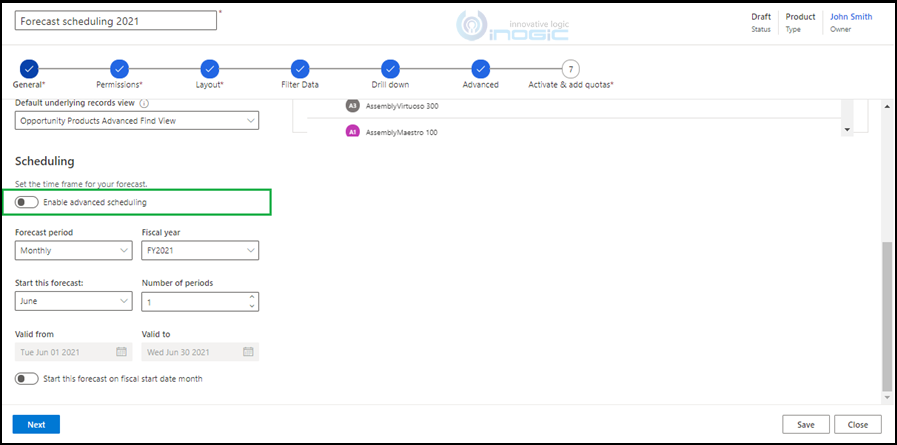
While configuring the forecast there is “Enable advanced scheduling” option available under the “General” tab as shown below:
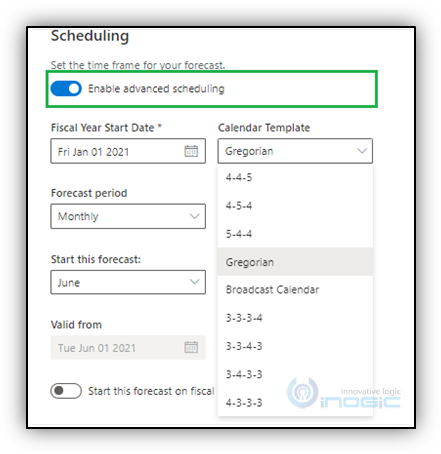
We can schedule the periods as per the organization’s needs by picking up the defined calendar templates. This will then help to filter the forecast records in proper and managed way with respect to months and year.
Note: By default “Enable Advanced Scheduling” toggle is disabled and you can use the scheduling option that you previously had.
In Advance Scheduling, you have the flexibility to select different calendar templates as per your organizational needs.
 Calendar Templates:
4-4-5, 4-5-4, and 5-4-4 calendar template:
These calendar templates are divided into three quarters with each quarter consisting of 13 weeks. In the 4-4-5 quarter, two months are of 4 weeks and one month is of 5 weeks. Similar concept is applied for 5–4–4 or 4–5–4 templates.
4-4-5 template:
- Select the Calendar Template: 4-4-5
- Forecast Period: Monthly
- Start this forecast: M1
- Number of periods: 1
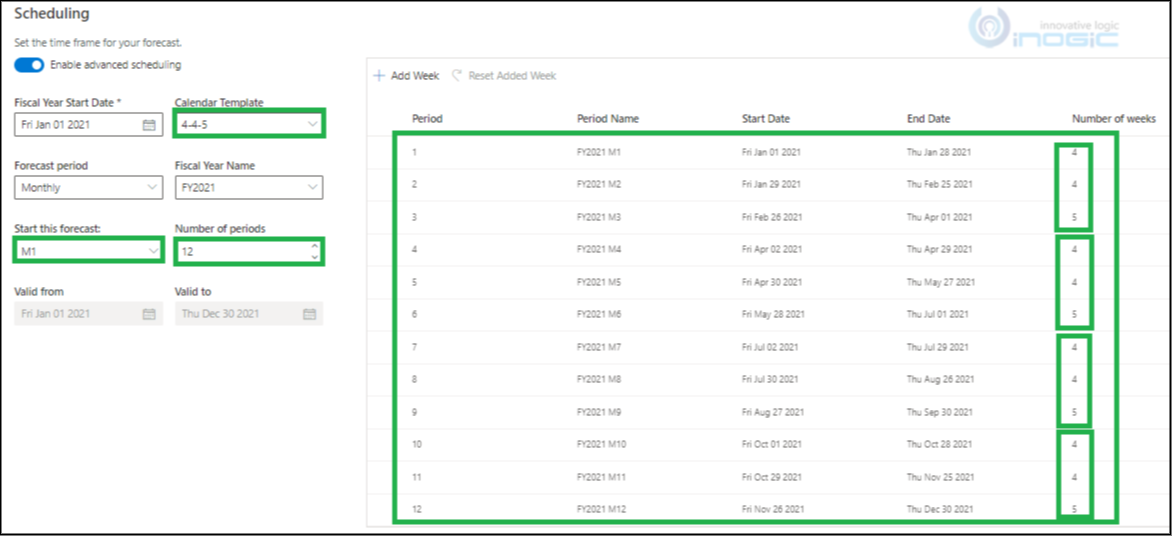
The configuration will look as follows:
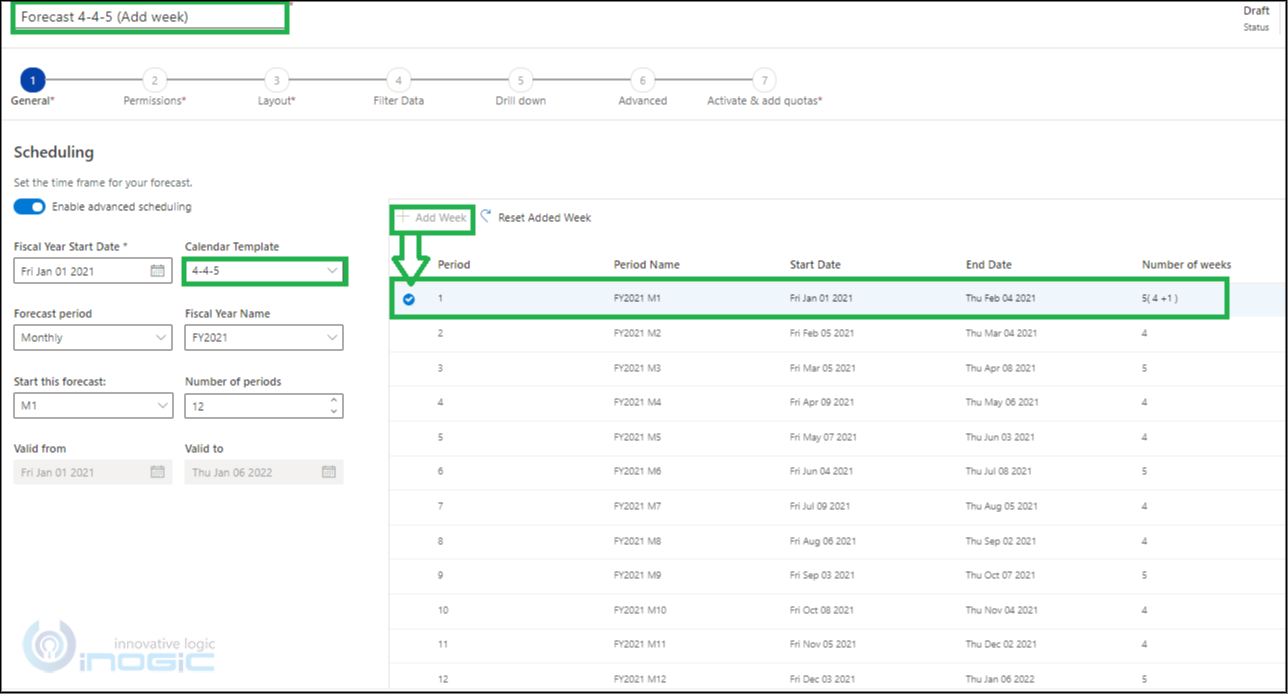
If you want to schedule this for 12 months then increase the “Number of periods” up to 12 and you will observe the periods are added automatically under the preview page. You will observe that the 4-4-5 template breakdown is applied on the added periods as shown below:
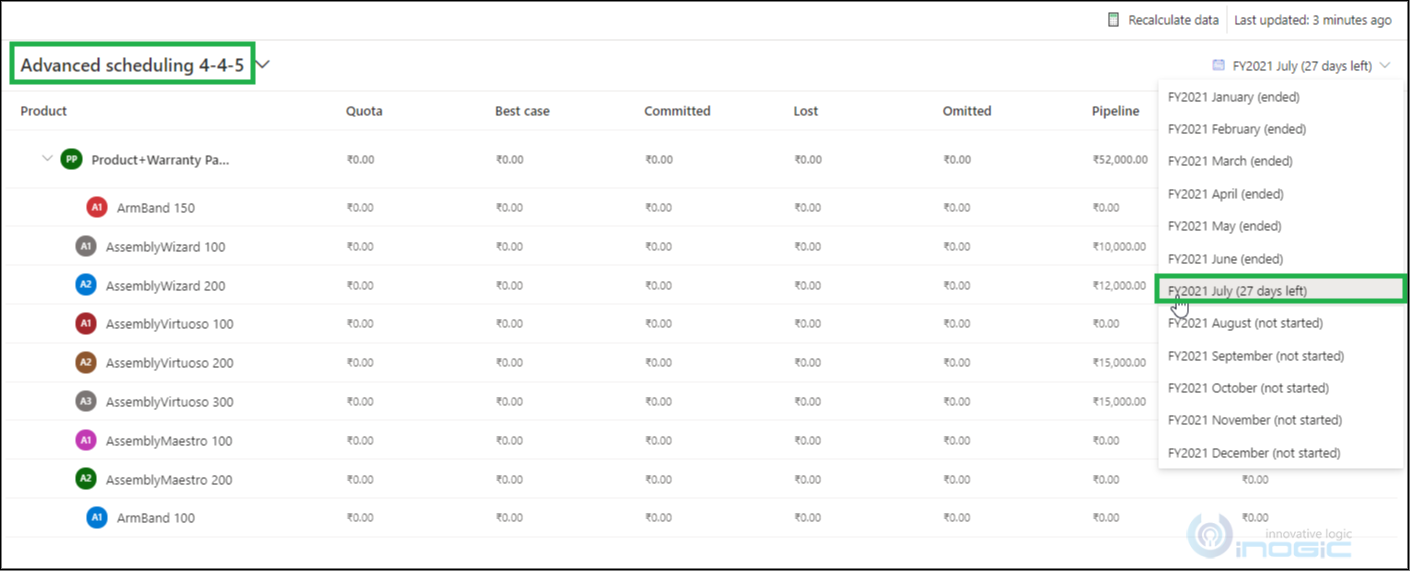
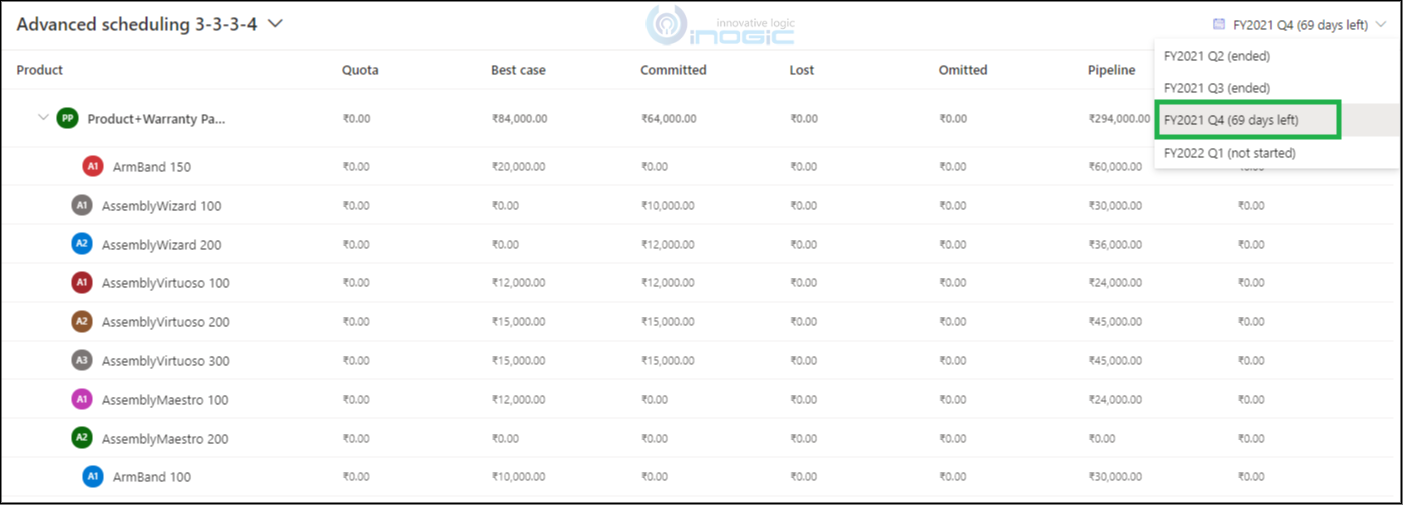
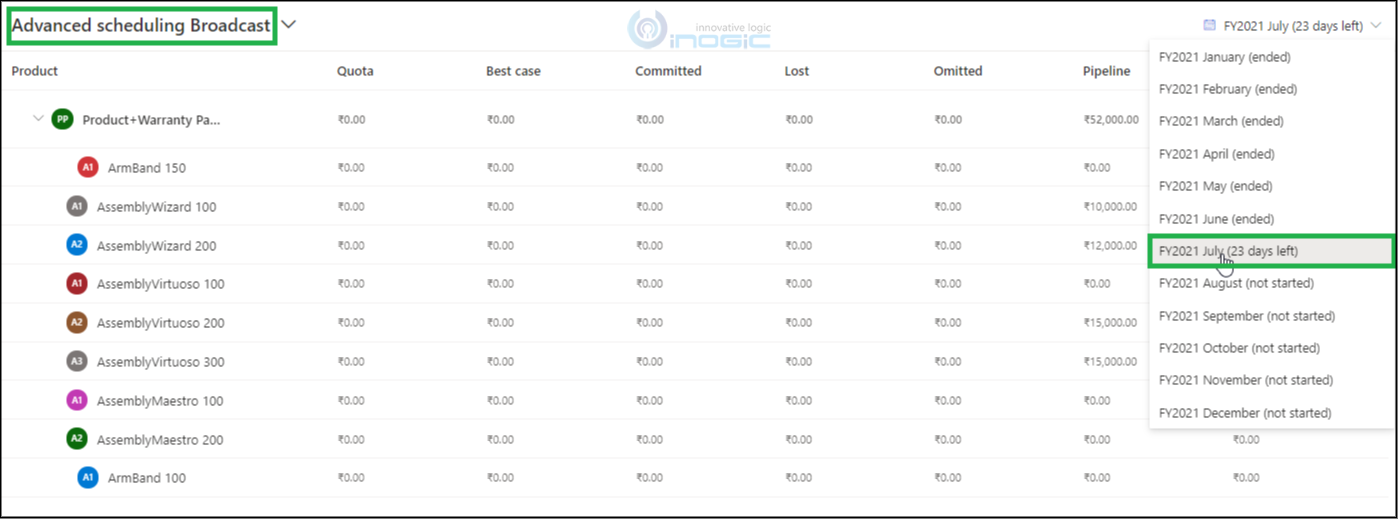
Navigate to Sales–> Forecasts and select the appropriate forecast. When you click on the drop down at right-hand side for filtering based on period, you will observe all the periods are available for selection with the status (ended, days left, not started) of each in the bracket as shown in below screenshot:
For example, “FY2021 July (27 days left)”- shows the days left, the days left calculation happens as the difference between “End date– current date” for that particular period refer “FY 2021 M7” that listed above in the period page.
It filters the forecast records that fall in the period selected from the drop down appropriately as shown below:
If you select the “Forecast Period” as Quarterly as shown below then, you will observe the Quarter wise 4-4-5 template breakdown applied (13-weeks in each period/quarter) as shown below:
4-5-4 template:
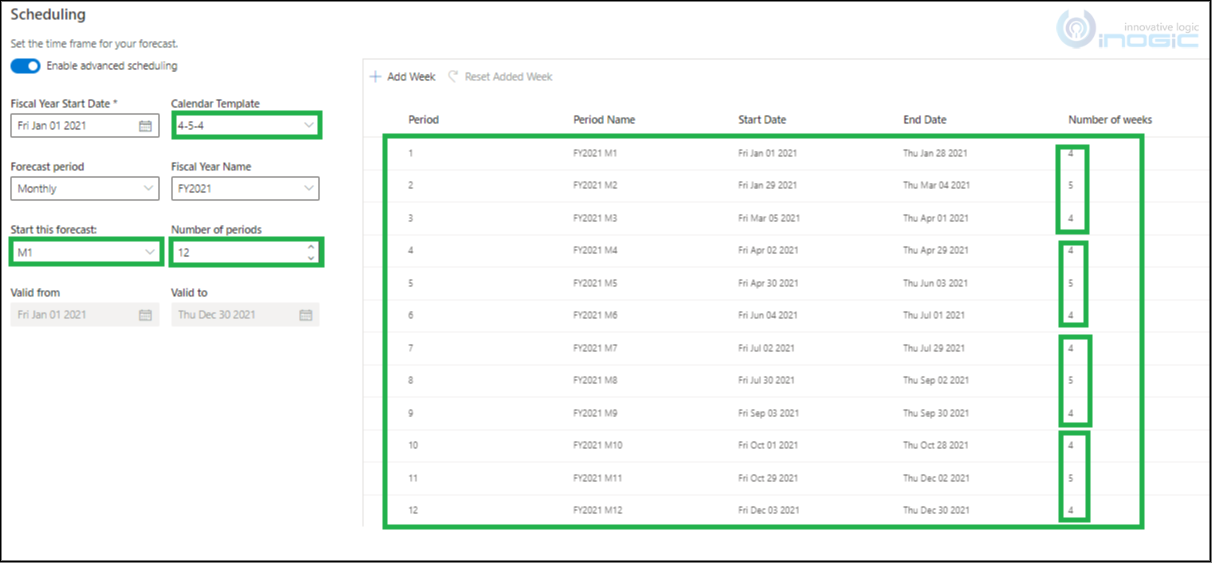
If you want to schedule using the 4-5-4 template then simply switch the “Calender Template” to 4-5-4, and make sure that “Forecast Period” selected is Monthly. The moment you do so the 4-4-5 template breakdown is applied on the added periods as shown below:
5-4-4 template:
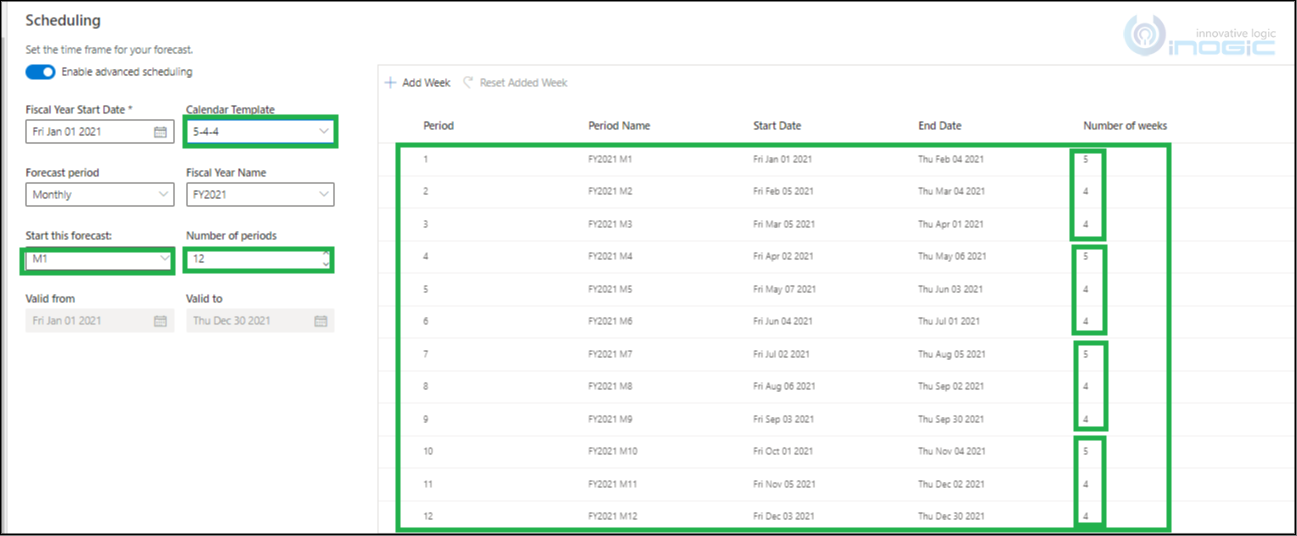
If you want to schedule using a 5-4-4 template then simply switch the “Calender Template” to 5-4-4, the moment you do so instantly 5-4-4 template breakdown is applied on the added periods as shown below:
3-3-3-4, 3-3-4-3, 3-4-3-3, and 4-3-3-3 calendar template:
In this Calendar 3 quarters consist of 3 periods and 4th quarter consist of 4 periods that means every year consist of total 13 periods (i.e- 3+3+3+4=13 periods). Each period is of 4 Weeks. Similarly, the grouping applicable for 3-3-3-4, 3-3-4-3, 3-4-3-3, and 4-3-3-3.
3-3-3-4 template:

3-3-4-3 template:
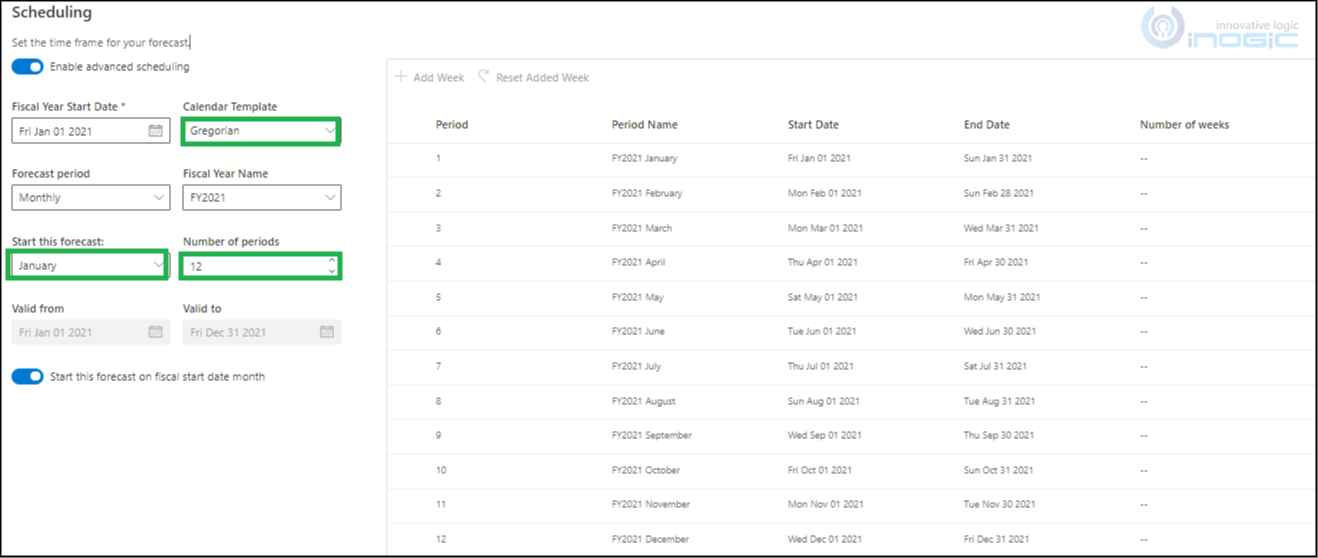
Gregorian calendar template:
In this calendar, start date is from 1 January and end date is 31 December because its 12-month period. Notice that there is no week grouping; hence, number of weeks are blank as highlighted below:
Select Fiscal Period = Quarterly, as shown below.
Select Fiscal Period = Monthly, as shown below.
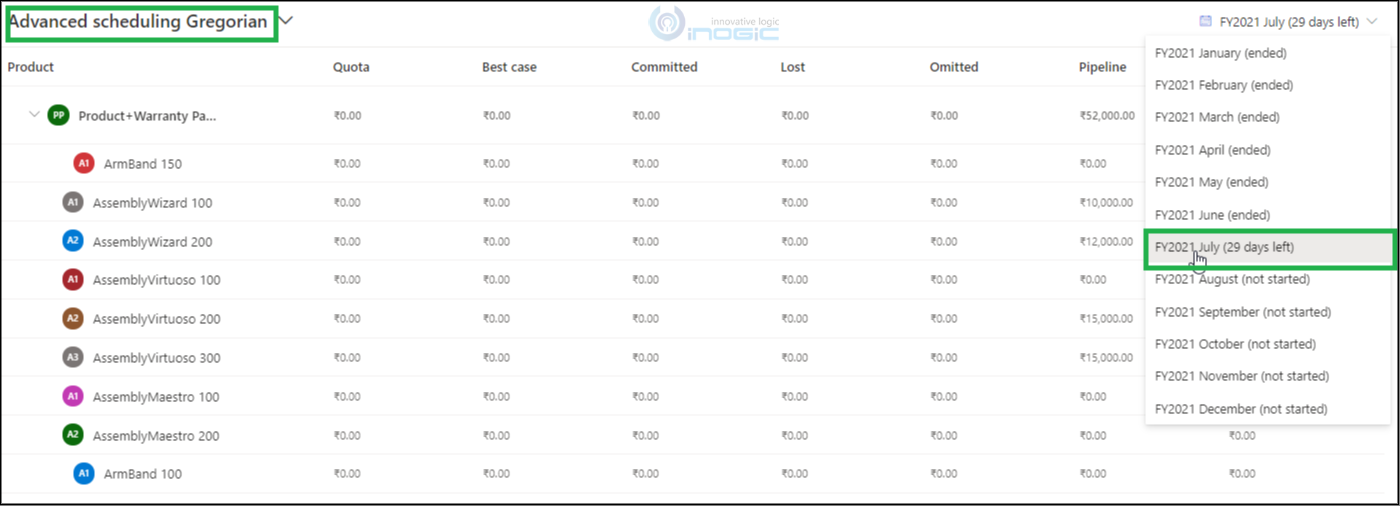
Navigate to Sales–> Forecasts and select the appropriate forecast to see the forecast data:
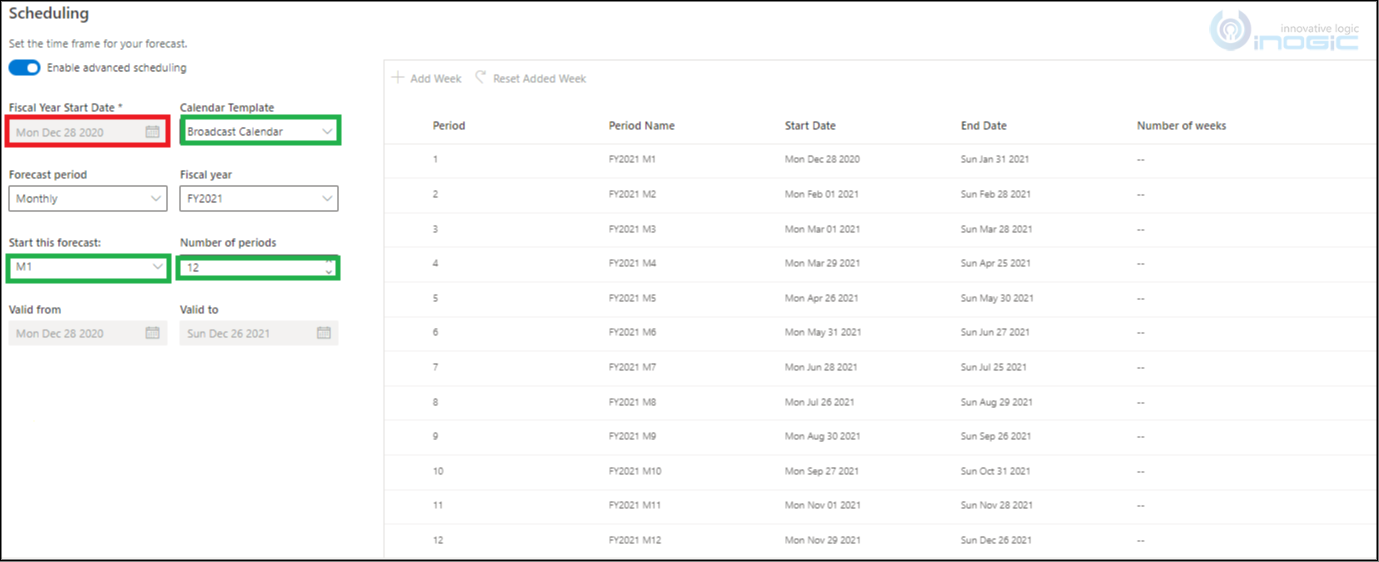
Broadcast calendar template:
In Broadcast calendar, every month has either four week or five weeks and each week starts on Monday and ends on Sunday. That means each month is of 28 days or 35 days.
Note: There is no week grouping; hence, number of weeks are blank as highlighted below:
Select Fiscal Period = Quarterly, as shown below.
Select Fiscal Period = Monthly, as shown below.
Note: When you choose this option, the “Fiscal Year Start Date” is automatically set to the Monday in the week that contains January 1 and it is non-editable.
Navigate to Sales–> Forecasts and select the appropriate forecast to see the forecast data:
Add week feature:
You can add an extra week to a specific period by clicking “Add week” as shown below. Select the period and click on “Add week”. By clicking it, 1 week (7 days) is added in the selected period and the subsequent period date is extended by 1 week.
Reset Added week feature:
Anytime you can reset the week added by “Reset Added Week” button.
Note:
- Only one-week adjustment is allowed through “Add week” button. Once week is added by clicking on “Add week” button, it is disabled until you click on “Reset Added Week” button.
- For Gregorian and Broadcast calendar template, “Add week” button is always disabled.
Conclusion:
Advance Scheduling is newly introduced configuration in which we can log forecast records in proper and managed way with respect to months, years and as per the organization’s needs by following appropriate calendar template.
One Pic = 1000 words! Analyze data 90% faster with visualization apps!
Get optimum visualization of Dynamics 365 CRM data with –
Kanban Board – Visualize Dynamics 365 CRM data in Kanban view by categorizing entity records in lanes and rows as per their status, priority, etc.
Map My Relationships – Visualize connections and relationships between Dynamics 365 CRM entities or related records in a Mind Map view.

 Calendar Templates:
