Introduction
InoLink has a great feature named ‘Link Existing Customers’ and ‘Link Existing Products’, using which, the user can link all your existing Customers i.e. Accounts and Contacts, and Products between the two systems i.e. Dynamics 365 and QuickBooks Online.
Let’s say you have been using Dynamics CRM, and QuickBooks Online for a long time and until now you have been managing both the systems manually i.e. whenever you change a name of one Account record in Dynamics CRM, you do the same manually in QuickBooks. No need to do that anymore.
Using InoLink’s Link Existing Customer feature you can link all the Account, and Contact records between the two systems hassle free.
Once you have configured your QuickBooks Accounting Company in Dynamics CRM using InoLink, you will see Link Existing Feature under the section ‘What would you like to do?’ as shown in the below screenshot.


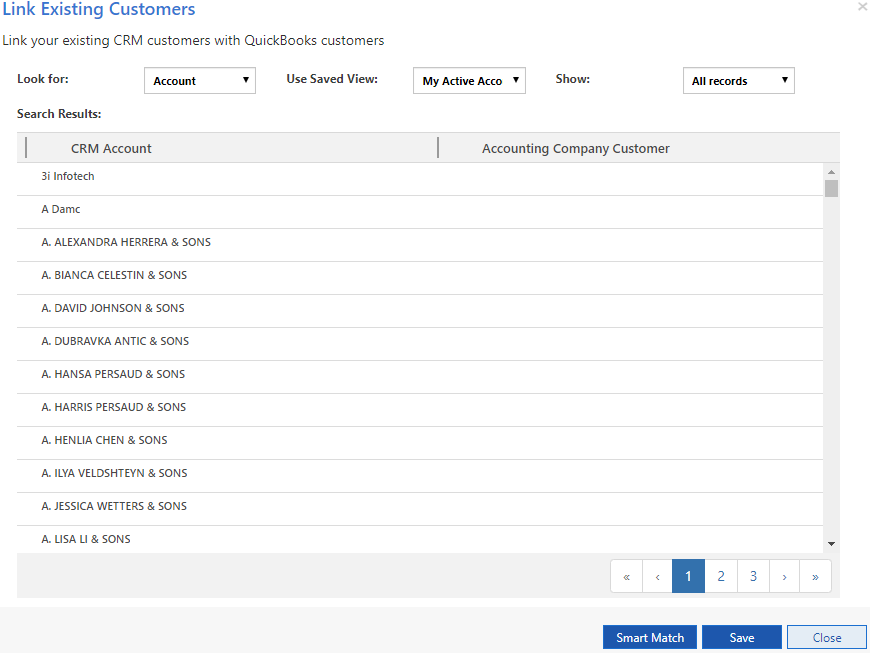
This is the view of Link Existing Customers.
Let’s focus on how to make the most of this feature, starting from the top of the screen.
1. Look for:
This is a dropdown which contains only 2 values i.e. Account, and Contact. Depending on which entity record to sync, user can select his desired option.
2. Use Saved Views:
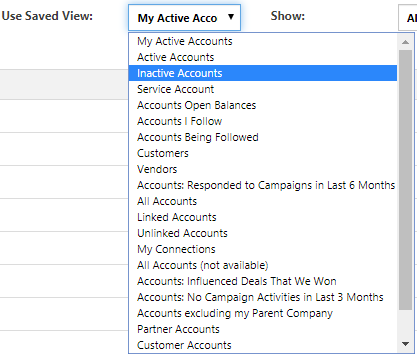
This dropdown will populate all the available views in your Dynamics 365 CRM for the selected entity in Look for: field.
3. Show:
Here, the user can select the type of records that need to be displayed. If ‘All records’ option is selected, then it will display Linked as well and Unlinked records between both the systems. Similarly if ‘Linked records’ option has been chosen, then only Linked records between both the systems would be displayed in the grid.
Let’s see how the ‘Linked records’ view looks like if selected.
As there is only one linked records between both the systems, only one record has been displayed in the Grid.
Now let’s move on how to link all the records between both the systems.
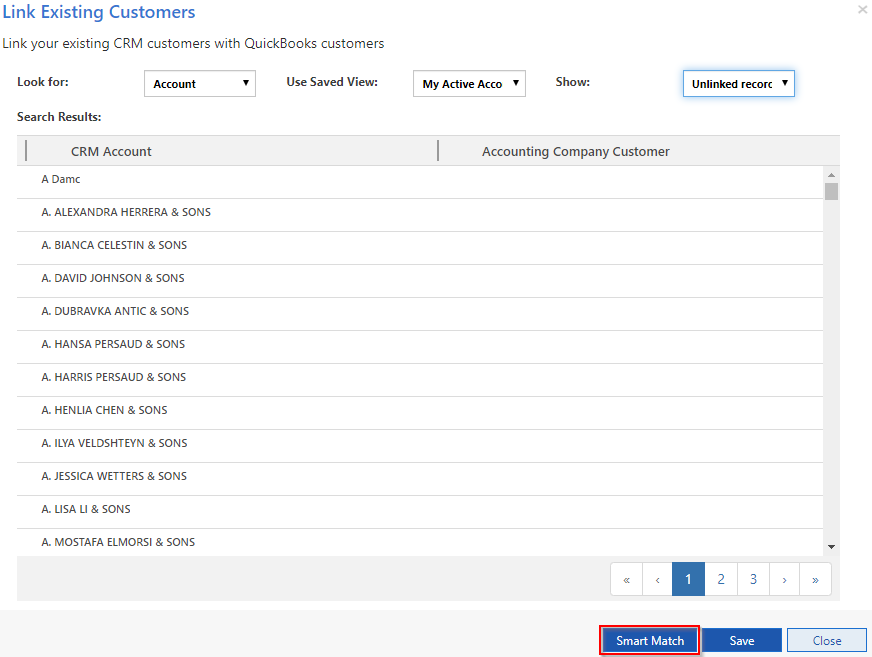
Link Existing feature has a button named Smart Match, on clicking, it would match all the records between both the systems automatically. It matches all the records with its exact name, if it doesn’t find exact name, then it tries to search for a similar name i.e. if you have an Account in Dynamics 365 CRM named Inogc and in QuickBooks online you have a Customer named Inogic, then it will link both these records.
Once clicked on Smart Match, it will start processing all the records, match the records based on the name, and link the records between the two systems.
If a user wants to cross match records between QuickBooks and Dynamics CRM, that is allowed as well, i.e. if there’s an Account named Inogic in CRM, and in QuickBooks, it is named Inogic India Tech Pvt. Ltd., as these both records are of the same company, user can cross match and link both these records.
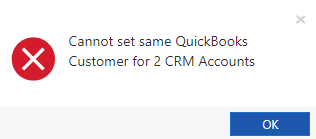
Link existing feature doesn’t allow the user to match same QuickBooks record to two different Dynamics CRM record. If a user will tries to do that, then an error popup would be displayed saying –
The reason InoLink doesn’t allow to set same QuickBooks record for two CRM record is that, if it links both CRM record to one QuickBooks, then there are chances that your QuickBooks data might get corrupted.
Finally, on clicking on Save button, all the records that have been matched with each other, or cross matched will get linked, and whenever our QuickBooks to Dynamics CRM services would run, it would update the records that have been linked, and similarly if you update a record in Dynamics CRM, it would update the same linked record in QuickBooks.
Conclusion
With the help of Link Existing feature you can link the records in Dynamics 365 CRM and QuickBooks automatically.


