Introduction:
PowerApps is a quick service that helps you to easily build business apps that runs on browsers and in phone or tablet without any coding experience needed. It allows anyone in an organization unlock new business agility.
Recently we had a business requirement, where we need to work on lookup field of Dynamics 365 using PowerApps, but currently, we cannot directly fetch the lookup values in PowerApps. So after some research and play around we found a solution on this.
This blog explains about steps to read and set Lookup fields of Dynamics 365 in Power Apps.
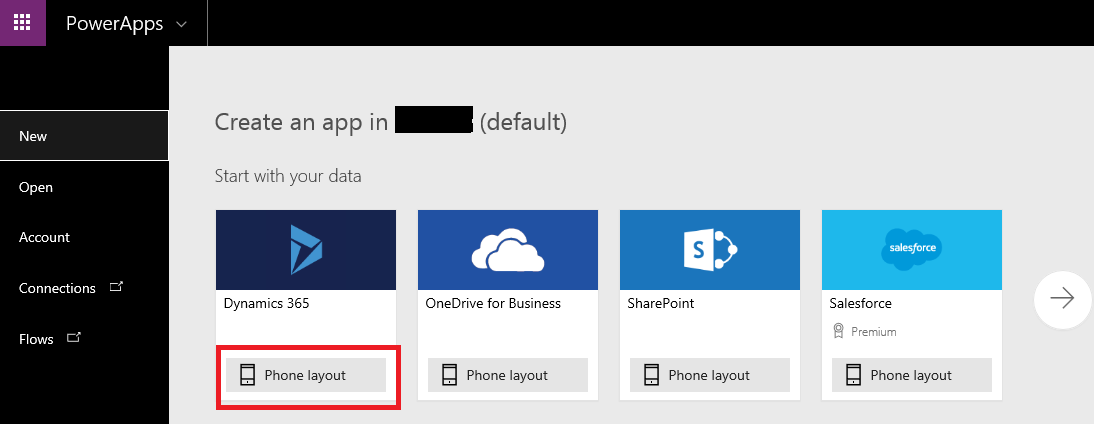
1. Create a new power Apps by selecting the Phone Layout as shown in the below screenshot.
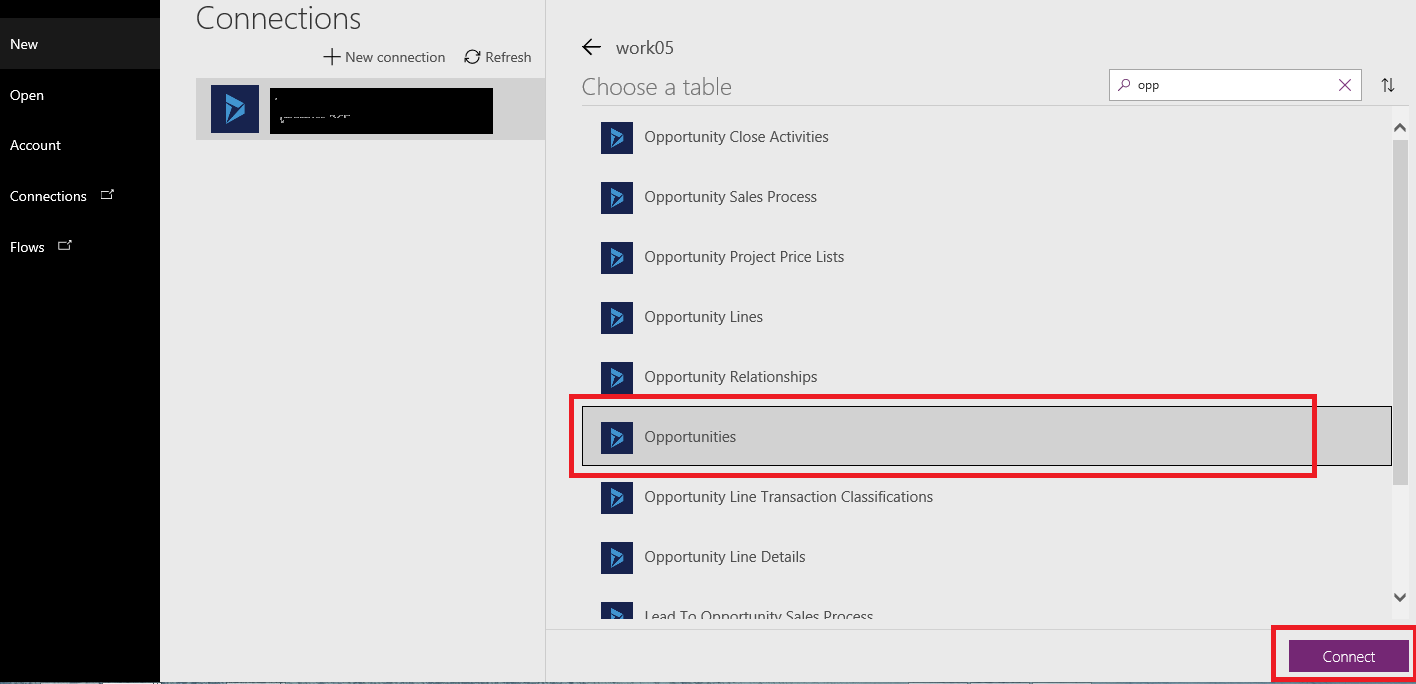
2. Select the database i.e. Entity and then click on Connect as shown in the below screenshot.
3. We get the following three screen on the left side
- Browse Screen
- Detail Screen
- Edit Screen
4. Click on Browse Screen and user can see the List of Opportunities in the CRM.
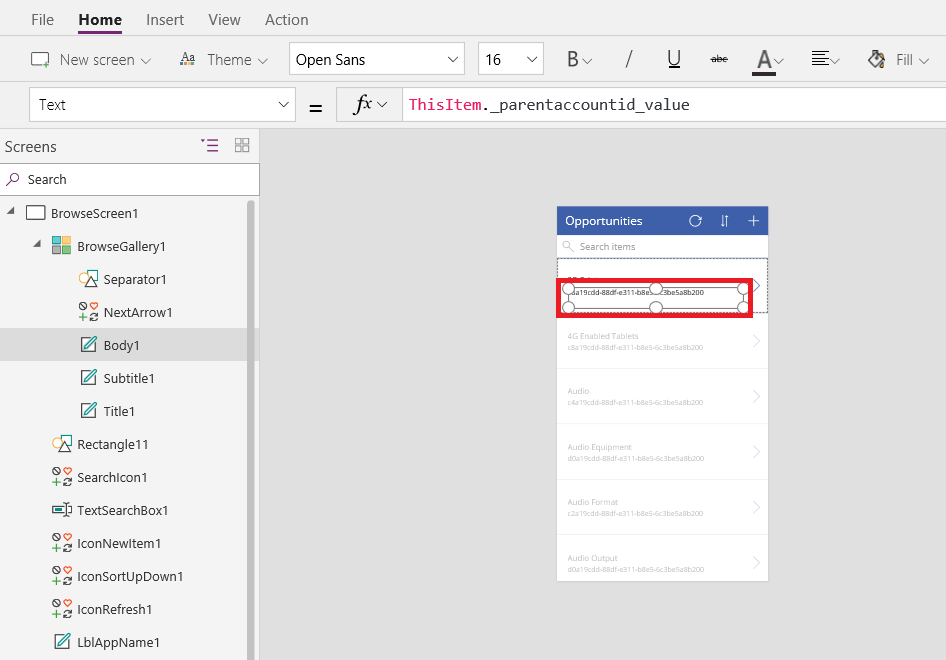
5. Now as seen in the below screenshot user can see GUID of parent account.
To display the name of the parent account follow the steps as given below:
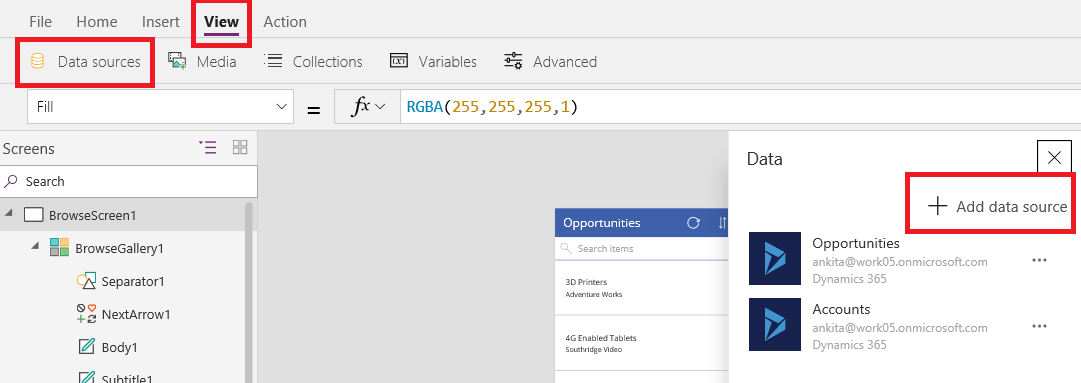
- Add a data source of Account i.e. Account Entity by selecting on View, Data source and then select “Add Data Source” as shown in the below screenshot.
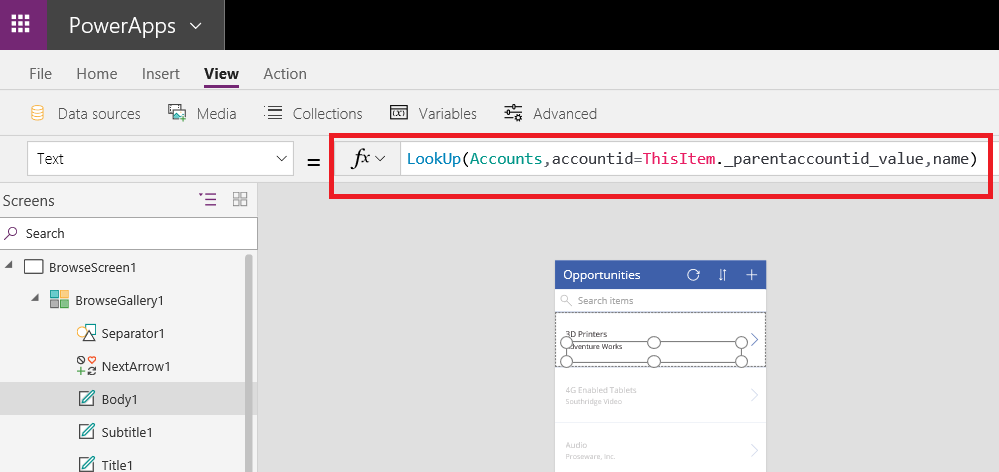
To display the name of the parent account set the text property of the Body1 which contains parentaccountid as below:
LookUp(Accounts,accountid=ThisItem._parentaccountid_value,name)
The Lookup Property search the accountid in Accounts which equals to GUID shown in textbox and returns the name of the Account.
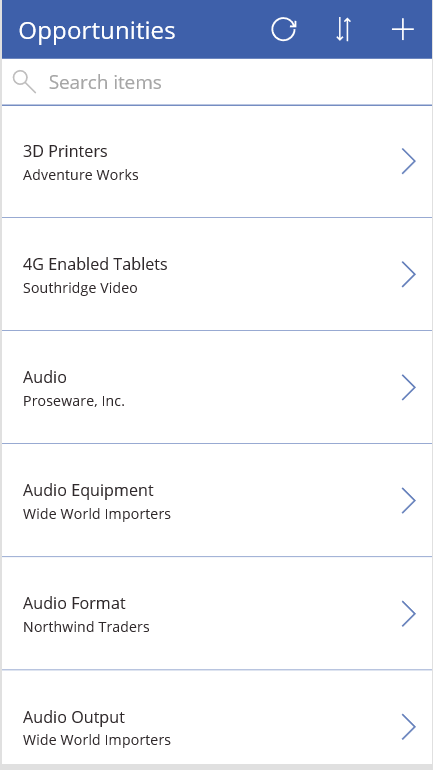
Now you can see the name of the parent Account which is selected on Opportunity as shown below.
Following are the steps to assign Lookup value in PowerApps:
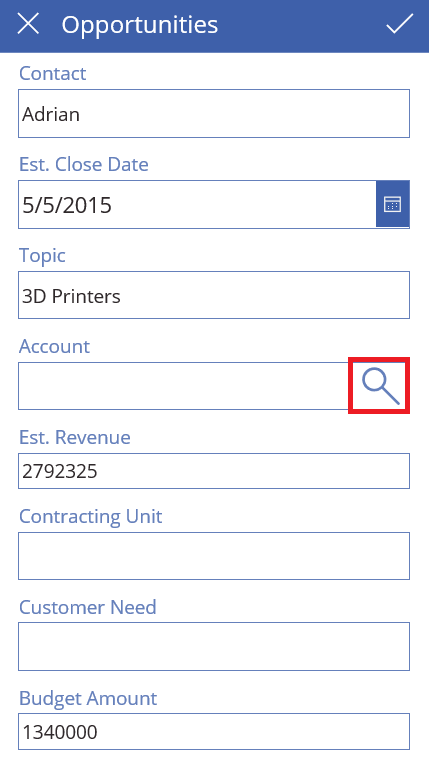
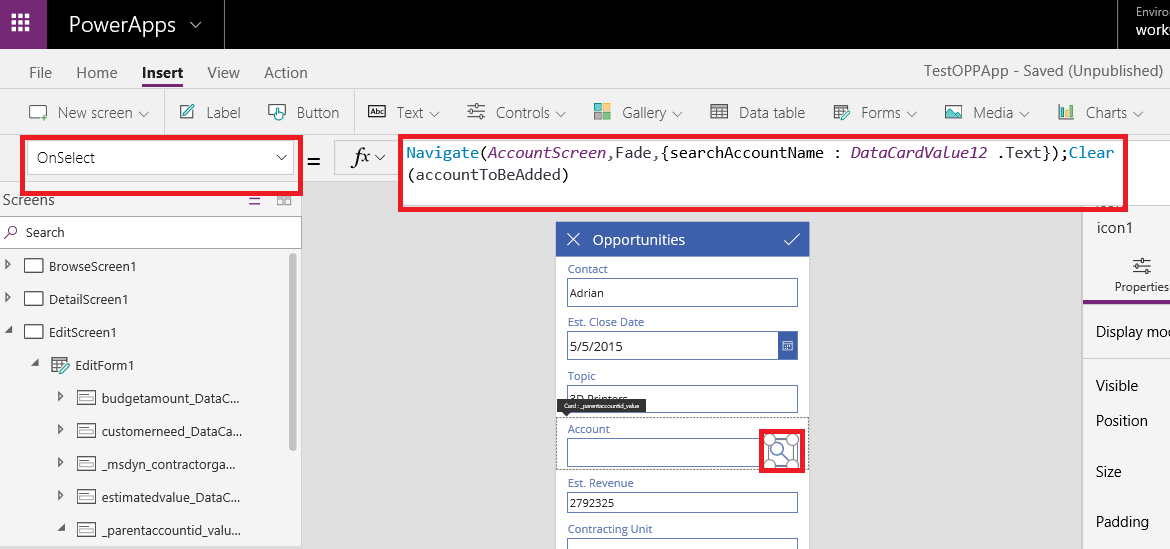
1. Click on Edit Screen and insert the “Search” Icon inside a Data Card as shown in the below screenshot.
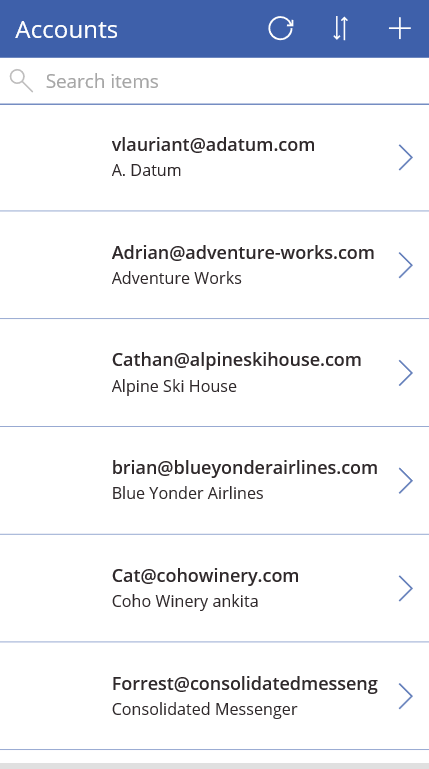
2. Insert another List screen and add data source as Accounts. This screen will show list of Accounts present in CRM.
3. On “OnSelect” property of Search Icon set the formula as:
Navigate(AccountScreen,ScreenTransition.Fade,{searchAccountName : DataCardValue12 .Text});Clear(accountToBeAdded)
The above formula will navigate the Account Screen which shows list of Accounts and update the value of searchAccountName by value in DataCardValue12
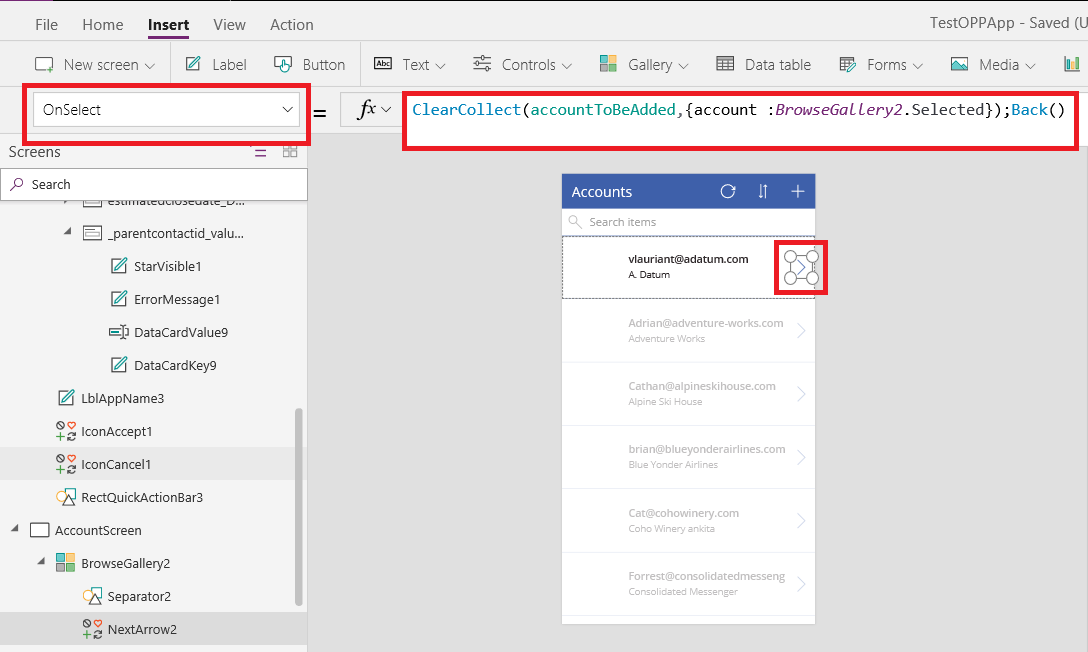
4. Now on Account Screen, on “OnSelect” property of icon write the formula as
ClearCollect(accountTobeAdded , {account :BrowseGallery2.Selected});Back()
This formula create a collection name as “accountToBeAdded” and add the selected account in Collection and navigate back to the Edit Screen.
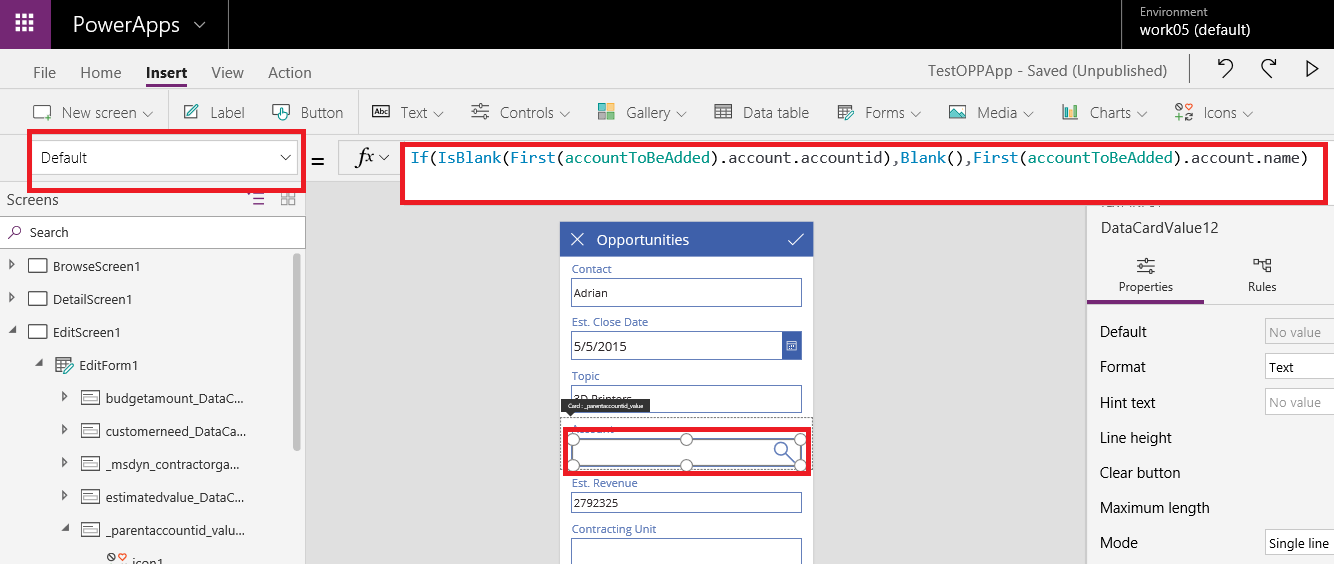
5. Now go back to the edit form, on text box of the Account set the Default property as following:
If(IsBlank(First(accountToBeAdded).account.accountid),Blank(),First(accountToBeAdded).account.name)
This formula check whether the “accountToBeAdded” collection contain accountid. If true set the name else set it as “Blank”.
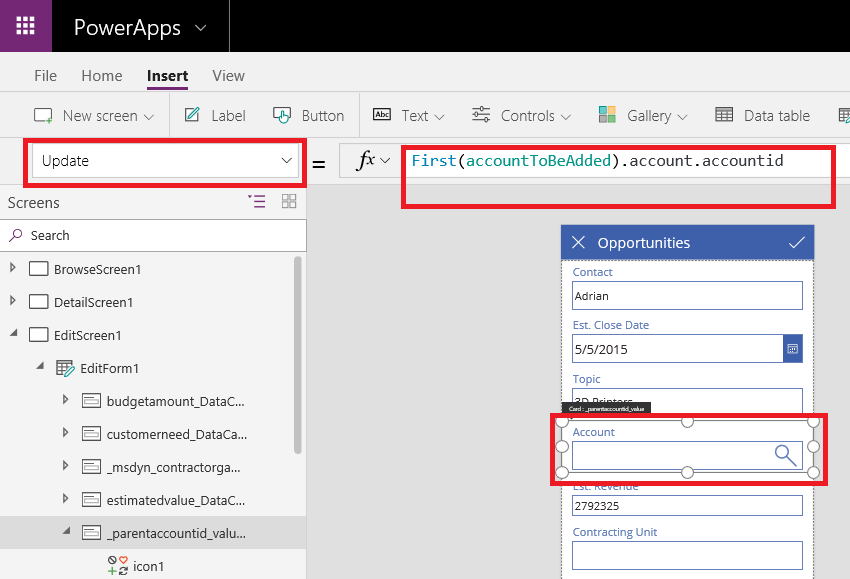
6. On Update property of Data Card set the formula as:
First(accountToBeAdded).account.accountid
The above formula will update the Data card value to the selected account.
Conclusion:
Using the simple steps explained in this blog user can read and set Lookup fields of Dynamics 365 in Power Apps.
Free 70% of storage space in CRM with Attachment Management Apps!
Attach2Dynamics – Store and manage documents/attachments in cloud storage of your choice – SharePoint, Dropbox or Azure Blob Storage from within Dynamics 365 CRM.
SharePoint Security Sync – Robust and secure solution to integrate Dynamics 365 CRM and SharePoint Security Sync thereby ensuring secure access to confidential documents stored in SharePoint.
I’ve completed this work-around, but ran into one issue. I can’t seem to make the DataCard it belongs to Valid as a required field. The validity of the field doesn’t seem to realize there is a value so it stays Invalid. Is there a way to make this work?
Power App does not enforce field to set as required as shown in dynamics365.
1.To make the fields required we can set a the Onselect property of Submit icon as:
If(!IsBlank(DataCardValue18.Text),SubmitForm(EditForm1),UpdateContext({ShowMessage: true}))
The above formula will validate if DataCard contains value, if true will submit the record else will update the ShowMessage variable to true.
Please see the screenshot below:

2.Now, add a label to show the error message and set the visible property of label as ShowMessage.
3.Now if the DataCard does not contains value, error message will be displayed.
Please let us know if we are missing something so that we can assist you further.
Thanks!
I’m stuck on Step 4. Could you please help?
In my case, instead of Accounts I’m working with a custom entity called Districts.
I got Step 3 to work (it gave me an error until I did Step 4, because Step 4 initializes the “districtToBeAdded” collection).
But Step 4 produces another “Name isn’t valid” error. Is it because of the “{district : DistrictList.Selected}” context? Do I need to initialize something called “district” first?
Here’s my attempt at step 4: https://case-my.sharepoint.com/:i:/g/personal/jzimmerman_casedupage_com/EVsv0OZhhnlFuJgfAaZ7roQBS2i57Ej2nxmutZ6bDjgeRg?e=2OLgez
Don’t know what happened to that link. New link.
https://case-my.sharepoint.com/:i:/g/personal/jzimmerman_casedupage_com/EVsv0OZhhnlFuJgfAaZ7roQB_DGRpoxPJy40yw_5n4BupA?e=I4E52G
Nevermind. I entered the name of the screen instead of the card, “BrowseGallery2”
No, you do not need to initialize district first to store the values in the collection because all variables are initialized implicitly when declaring in Collection.
You can refer below link to understand more on variables:
https://docs.microsoft.com/en-us/powerapps/maker/canvas-apps/working-with-variables
The formula to store the value in collection is below:
ClearCollect(districtToBeAdded, { district : BrowseGallery2.Selected });
Make sure you are selecting a record from the gallery and not from the card to add the record in the collection.
Regarding Error “Name isn’t valid”: Every time you create a new collection in Power App the name of the collection must be unique.
Hope this helps!
Thanks!
Im stuck on the last part step 6. I’m working with User entity to assigned stuff. Search icon goes to the UserScreen. Selects Users Just fine. Stores Users in the variable & collections just fine. Get to step 6. Tried systemuser.systemuserid which should be the equivalent id for system user entity vs accounts.
When i use this First(userToBeAdded).systemuser.systemuserid on a textinput field. It works fine. I tested 2 text input fields to verify the search icon was working. Shows the user and user id. When i use it on a DataCard as you instructed. I keep getting this error “The property expects Record values, but this rule produces incompatible Guid values”. If i ignore step 6 the app performs everything right except saving the values properly. So assuming i need step 6 to finish this off.
We are unable to replicate such issue. Please, can you provide us exact steps on this issue?
Let us know how you are updating record in CRM using Patch function or Submit Form function in Power App.
Thanks!
I have Dynamics 365 as the data source and I have a lookup field in D365. In my PowerApps edit form when I add the lookup field as a dropdown it shows up but is pointing at the wrong data. I can change the data to point at the correct things and the lookup field works as I want it too. However the lookup field does not save correctly. Is it somehow possible to save this lookup field as it functions just as i want it to?
Thanks
Hi,
As per step 6 in our blog make sure you update the correct field name of the lookup.
And as per your question, yes we can update lookup field in CRM using patch function.
You can refer below link to understand more on patch function:
https://docs.microsoft.com/en-us/powerapps/maker/canvas-apps/functions/function-patch
Simply filter the record by patch request and update the lookup field by setting fields “type” and “value” of the lookup field.
Example: _parentaccountid_value: Set the GUID of the record.
_parentaccountid_type: Set the entity name in string.
For more information you can refer the blog as below:
https://www.inogic.com/blog/2018/07/create-attachment-in-crm-with-camera-control-using-canvas-app-in-powerapps/
Hope this helps!
Thanks!
Hi,
I have followed the step to work with my App. I am fine with the first 5 steps. However, there is no update function as my one is a custom entity.
When I create or edit a record, I can’t save or update the value in the lookup filed. I have read the Patch function, as there are 3 custom lookup filed in my EditForm, and I need to deal with non-fixed records smartly rather than mentioning the name of a specific record.
Please advise how can I achieve my goal.
Thank you,
Lee
Hi,
Please follow below steps to save the value in the lookup field:
1. On default property of textbox write the formula as “First(accountTobeAdded).account.’Account Name’” as shown in below screenshot:

2. Now insert a label below the textbox and add the text property as “First(accountTobeAdded).account.Account” as we need to store GUID of the record for later Patch request to create/update record.
Please see the screenshot below:

3. Now while using Patch function to create/update the record, add value to the field as GUID(label3.text)
For Example: storename: GUID(Label3.Text),
FYI, later you can hide the label from the form by setting the visible property as false.
Let us know if you have any queries regarding the same.
Hope this helps!
Hi,
Thank you for your timely reply. I have followed your advise, however, I still cannot update the data.
I have tried both ways in {Division:DataCardValue4} and {Division:Label1}.
Sorry I cannot attached a screenshot here directly. Please check my codes in the following link.
The Screenshot of my App: https://imgur.com/a/9TankCi
Thank you again and looking forward your reply,
Lee
Hi,
In the first screenshot you provided as below:
Update “{Division: DataCardValue4}” as “{Division: GUID(Label1.Text)}” to update the lookup field.
Hope this helps.
Thanks!
Good morning,
We are currently having troubles with step 3; specicially the “searchAccountName”. Is this a new collection? or is this a named field/lbl on your Accounts screen?
For context – we are getting everything to work except the searching of the Accounts page (and the filtering of the gallery by the search).
Thank you.
The ‘searchAccountName’ is the context variable which is set as input in the DataCardValue and this variable is passed to the account screen using the UpdateContext function in Navigate function.
For more information, refer the below link:
https://docs.microsoft.com/en-us/powerapps/maker/canvas-apps/functions/function-navigate
Regarding ‘filtering of the gallery by the search’, you can further use ‘searchAccountName’ variable for filtering account records by the account name entered by user. You can update below formula on Item property of Account Browse gallery:
SortByColumns(Search(Accounts,searchAccountName,”name”),”name”,If(SortDescending1,Descending,Ascending))
Hope this helps.
Thanks!
HI,
Thank you for this much-needed workaround.
My issue is that, it will display the GUID in the gallery and the edit screen, how can i change that?
In my case, I am only using CRM to get client Name and store different information on SharePoint.
Link to some images.
https://ibb.co/s2zFfgX
https://ibb.co/dWbFPqb
Hi,
You can add the data source of the entity from which you want to replace the GUID. Then use ‘Lookup’ function to identify the name based on GUID.
For Example: LookUp(Accounts,accountid=ThisItem._parentaccountid_value,name)
You can refer below link to get more information on Lookup function in Power Apps:
https://docs.microsoft.com/en-us/powerapps/maker/canvas-apps/functions/function-filter-lookup
Please follow step no. 5 mentioned at the beginning of the blog to read Lookup fields of CRM in PowerApps so you can replace GUIDs with appropriate record names in PowerApps.
Let us know if you need any further assistance.
Thanks!
Hey guys,I am getting an error when using the lookup function.Anyone has an idea ?
Please give us the details about the error you are facing while using the lookup function so that we can look into this more.
Thanks!
Any idea on How to blank check on Lookup field in Crm 365 from Power apps.
I got field name Organisation in crm 365 which is lookup field i want to do blank check from my power apps
Any Idea
You can use IsBlank or IsEmpty function in power apps to check if the lookup field is blank. The return value for IsBlank and IsEmpty is a Boolean true or false.
Example: IsBlank(Organisation)
Please refer the below link for more details:
https://docs.microsoft.com/en-us/powerapps/maker/canvas-apps/functions/function-isblank-isempty
Can we sort/sortbycolum or search /filter by account in browsegalleri1 ?
Yes we can add sorting on browsegallery1 by account as shown in below screenshot.
Need to add below formula in Items property of BrowseGallery1 as shown below:
Formula: SortByColumns(Search([@Accounts], TextSearchBox1.Text, “name”,”address1_city”,”address1_composite”), “accountnumber”, If(SortDescending1, Descending, Ascending))
Here for searching the records, “name”,”address1_city”,”address1_composite” fields are used and for sorting “accountnumber” filed is used as shown below.
For filtering and search you can refer below links for the reference:
https://www.inogic.com/blog/2019/06/filter-records-powerapps-based-on-the-owner-of-the-record-in-dynamics-365-ce/
https://docs.microsoft.com/en-us/powerapps/maker/canvas-apps/functions/function-filter-lookup
Hope this helps.
Thanks!
in your tutorial above, the datasource in browsegallery1 is opportunity, it means account shown as guid. it is still possible to this formula : SortByColumns(Search([@Accounts], TextSearchBox1.Text, “name”,”address1_city”,”address1_composite”), “accountnumber”, If(SortDescending1, Descending, Ascending)).
Thanks.
Yes, it is possible using the above formula. As you can see in the blog we have used Account and Opportunity data source and this formula is added on Account gallery to sort the accounts.
Thanks!
Hi,
Thanks for the blog. I am using CDS connector to create a simple “contacts” canvas App. however i am unable to see and select OOB “Account name” field(which is on contact record in Dynamics 365) from the list of fields when i click on “Edit Field” from properties panel. i want to show this field on all 3 (Browse Gallery, Edit and display form). Any idea why this is the case?
Regards
The ‘Account Name’ field on Contact entity is called as polymorphic lookups which means it can refer to a record from any entity in a set. The ‘Account Name’ field is type of customer so it can refer to a record in the ‘Account’ entity or the ‘Contact’ entity. This lookup type field is not accessible from the simple edit properties of the gallery so we need to write the expression in the Text property in the Browse Gallery.
Here, in the below example we have modified the Text property in Browse gallery with formula to show the selected Account or Contact record in ‘Account Name’ field. We have used IsType function to identify the entity type then used it to display the name of selected Account or Contact.
If( IsType( ThisItem.’Company Name’, [@Accounts] ),
“Account: ” & AsType( ThisItem.’Company Name’, [@Accounts] ).’Account Name’,
“Contact: ” & AsType( ThisItem.’Company Name’, [@Contacts] ).’Full Name’ )
Please see the below screenshot:

Note: You need to add data sources for the entity types that Account Name field could be i.e. in your case, Account and Contact.
You can refer below link to know more about polymorphic lookups in canvas app:
https://docs.microsoft.com/en-us/powerapps/maker/canvas-apps/working-with-references
Hope this helps.
Thanks!
Hello,
Any idea if i have an entity in CDS and want to update the lookup field in CDS, how it would be done.
Thanks in Advance.
Please find the below example in which we have considered updating the ‘Account’ lookup on the Opportunity entity. To set the lookup field using CDS refer to the below steps:
1. You just need to edit the ‘EditForm1’ of the EditScreen and add the field Account on the form as shown in below screenshot:
2. Now, if you run the app you will see the list of Account records from the CRM. No need to add additional formulas to work on lookup fields in Common data service.
If you want to update polymorphic lookups in Common Data Service you can refer below blog:
https://www.inogic.com/blog/2020/07/working-with-complex-data-types-in-canvas-apps-using-common-data-service-current-connector-lookups-polymorphic-lookups/
Hope this helps.
Thanks!