Introduction:
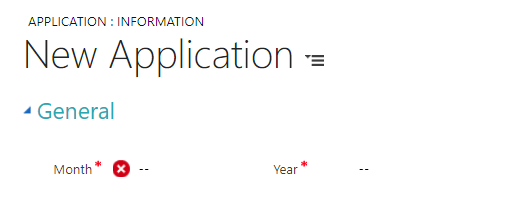
A lot of time we come across the situations where we would need to have one field to store just the Month part of the date and another one to store the Year part of the date. For example, Credit or Debit Card validity period where the user has to select Month and Year. In such cases, we could create one optionset field with options to select Month and number field to enter the year. In some scenarios, we create one Date only field and write a script or workflow to take the month and year part out from the selected date and store it in a separate Month and Year fields.
We have now found a better approach to tackle this kind of situation.
We can use the ‘Auto-Complete’ control for this purpose. The Auto-Complete control was introduced in Dynamics CRM 2016. This control provides suggestions to the user as soon as the user starts typing in the text fields.
Refer this article to know more about Auto-Complete control introduced in Dynamics CRM 2016.
Steps to create a Month and Year only fields using the Auto-Complete control:
1. First, create two text fields namely, ‘Month’ and ‘Year’.
2. Place these two fields on the entity form

3. Now, write a script to make these two fields act as an autocomplete and bind month and year collection to Month and Year field respectively.
Month collection:
var months = [
    { name: 'Jan', code: '01' },
    { name: 'Feb', code: '02' },
    { name: 'Mar', code: '03' },
    { name: 'Apr', code: '04' },
    { name: 'May', code: '05' },
    { name: 'June', code: '06' },
    { name: 'Jul', code: '07' },
    { name: 'Aug', code: '08' },
    { name: 'Sep', code: '09' },
    { name: 'Oct', code: '10' },
    { name: 'Nov', code: '11' },
    { name: 'Dec', code: '12' }
      ];
Year collection :
//get the start year as current year – 2 year
    var startYear = (new Date()).getFullYear() - 2;
    //get the end year as current year + 15
    var endYear = (new Date()).getFullYear() + 15;

    var yearList = [];
    //loop though endyear
    for (i = startYear; i <= endYear ; i++) {
        var obj = {};
        //set name for object array
        obj["name"] = i.toString();
        //set code for object array
        obj["code"] = i.toString();
        // insert into object array
        yearList.push(obj);
    }
This list is going start from the last two years from the current year and will end with next 15 years from the current year.
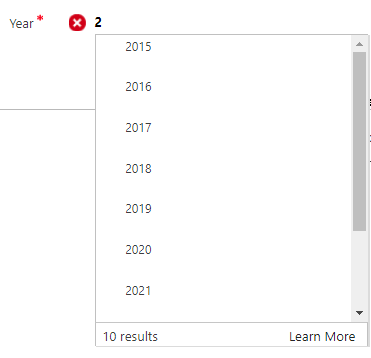
For example, if the current year is 2017 then the autocomplete suggestion list will show the list years start from 2015 to 2024. You can use your own logic to create the year list.
4. Call suggestMonth function on a load of form.
var suggestMonths = function (attributeName) {

    var    months = [
  { name: 'Jan', code: '01' },
  { name: 'Feb', code: '02' },
  { name: 'Mar', code: '03' },
  { name: 'Apr', code: '04' },
  { name: 'May', code: '05' },
  { name: 'June', code: '06' },
  { name: 'Jul', code: '07' },
  { name: 'Aug', code: '08' },
  { name: 'Sep', code: '09' },
  { name: 'Oct', code: '10' },
  { name: 'Nov', code: '11' },
  { name: 'Dec', code: '12' }
    ];

    var keyPressFcn = function (ext) {
        try {
            var userInput = Xrm.Page.getControl(attributeName).getValue();
            resultSet = {
                results: new Array(),
                commands: {
                    id: "sp_commands",
                    label: "Learn More",
                    action: function () {
                    }
                }
            };

            var userInputLowerCase = userInput.toLowerCase();
            for (i = 0; i < months.length; i++) {
                if (userInputLowerCase === months[i].name.substring(0, userInputLowerCase.length).toLowerCase()) {
                    resultSet.results.push({
                        id: i,
                        fields: [months[i].name]
                    });
                }
                if (resultSet.results.length >= 10) break;
            }

            if (resultSet.results.length > 0) {
                ext.getEventSource().showAutoComplete(resultSet);
            } else {
                ext.getEventSource().hideAutoComplete();
            }
        } catch (e) {
            // Handle any exceptions. In the sample code,
            // we are just displaying the exception, if any.
            console.log(e);
        }
    };

    Xrm.Page.getControl(attributeName).addOnKeyPress(keyPressFcn);
};
5. Call suggestYear function on load of form.
var suggestYear = function (attributeName) {
    // var getCurrentYear = +15;
    //get the current year -2 i.e starting year
    var startYear = (new Date()).getFullYear() - 2;
    //get the current year +15 i.e End year
    var endYear = (new Date()).getFullYear() + 15;

    // List of sample account names to suggest
    var yearList = [];
    //loop though endyear
    for (i = startYear; i <= endYear ; i++) {
        var obj = {};
        //set name for object array
        obj["name"] = i.toString();
        //set code for object array
        obj["code"] = i.toString();
        // insert into object array
        yearList.push(obj);
    }


    var keyPressFcn = function (ext) {
        try {
            //get input value
            var userInput = Xrm.Page.getControl(attributeName).getValue();
            resultSet = {
                results: new Array(),
                commands: {
                    id: "sp_commands",
                    label: "Learn More",
                    action: function () {

                    }
                }
            };
            //get user input value and convert inyo lower case
            var userInputLowerCase = userInput.toLowerCase();
            //loop thought the array list
            for (i = 0; i < yearList.length; i++) {
                //match the list with inputed value
                if (userInputLowerCase === yearList[i].name.substring(0, userInputLowerCase.length).toLowerCase()) {
                    resultSet.results.push({
                        id: i,
                        fields: [yearList[i].name]
                    });
                }
                //display matching list upto 10
                if (resultSet.results.length >= 10) break;
            }

            //set list if greater then 0
            if (resultSet.results.length > 0) {
                //set auto complete list
                ext.getEventSource().showAutoComplete(resultSet);
            } else {
                ext.getEventSource().hideAutoComplete();
            }
        } catch (e) {
            // Handle any exceptions. In the sample code,
            // we are just displaying the exception, if any.
            console.log(e);
        }
    };

    Xrm.Page.getControl(attributeName).addOnKeyPress(keyPressFcn);
};
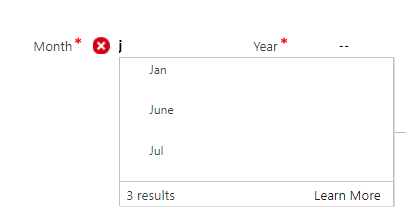
6. This way our standard text fields becomes auto-complete fields and will start showing the suggestion for month and year as soon as user starts typing as seen in the screenshot below;
Month:
Year:
7. Then finally add the validation code on change of these two fields so that the user cannot enter values other than the values present in the auto-complete list.
Note: Supported versions of this solution are CRM 2016 and above.
Conclusion:
Using the above-mentioned steps, the user can make use of auto-complete control feature of Dynamics 365 to create Month and Year only field.
Cut short 90% of your manual work and repetitive data entry!
Get 1 Click apps and say goodbye to all repetitive data entry in CRM –
Click2Clone – Clone/Copy Dynamics 365 CRM records in 1 Click
Click2Export – Export Dynamics 365 CRM Report/CRM Views/Word/Excel template in 1 Click
Click2Undo – Undo & Restore Dynamics 365 CRM data in 1 Click


