Introduction:
Stepping towards the enhancement, Dynamics CRM 2016 introduced ‘Web API’ as the new concept which delivers a unique development experience across a wide variety of programming languages, devices, and platforms.
We have earlier explored using WEB API through scripting from within Dynamics CRM environment in this blog.
We noticed quite a few queries coming up in forums about using WEB API through C# in code executed outside of CRM like a portal or other integration apps.
What is the difference?
The key difference lies in authentication. When we use scripts and execute from within Dynamics CRM using web resources, the authentication is automatically passed and we do not have to supply the authentication token header there.
But when we are connecting from outside of CRM context, it is important to authenticate the access credentials before they can connect and perform actions in Dynamics CRM.
Note: Some part of the code provided below has been taken from the Authentication library supplied in the SDK and that was the starting point for us to understand and get this working. We were however not able to get the code to execute as is and we try to explain the issues and resolutions to those through this blog.
Connecting using C# from a windows forms application
Here again, the method to pass authentication token varies depending on whether it is CRM On-Premises or CRM Online or IFD enabled deployment of Microsoft Dynamics CRM 2016.
When using windows forms, we realized that it was important to initiate the code as an async task to establish connection. If you do not initiate an async task, the code block to authenticate fails since that action is async.
So first in the form load, we initiate the Start() asynchronously.
private void CRUD_Load(object sender, EventArgs e)
{
   Task.WaitAll(Task.Run(async () => await Start()));
}
On-Premises Deployment
The following details are set in the config file for On-Premises connection
  <appSettings>
    <!-- FOR CRM OnPremise-->
    <add key="EndPointType" value="OnPremise"/>
    <add key="Username" value="username"/>
    <add key="Password" value="password"/>
    <add key="Domain" value="domainname"/>
    <add key="ServerAddress" value="http://ad10:5555/Testing2016/"/>
    <!--CRM ONPremise End-->
  </appSettings>
You need to execute your WEB API requests through the HttpClient object. When creating the object of HttpClient, pass the credentials along as shown in the code block below;
HttpClient httpClient = (new HttpClientHandler() { Credentials = new NetworkCredential(_userName, _passWord, _domain) });
//Base url of the CRM For e.g. http://servername:port/orgname
httpClient.BaseAddress = new Uri(_serviceUri);
Suppose you want to create a record in CRM then we need to create an HttpRequestMessage which needs to be sent.
//Http Request needed to be sent by the HttpClient
HttpRequestMessage request = null;
try
{
request = new HttpRequestMessage(HttpMethod.Post, “api/data/v8.0/accounts”); //uri to accounts
request.Content = new StringContent(content.ToString()); //JObject of the data to be posted.
request.Content.Headers.ContentType = MediaTypeHeaderValue.Parse(“application/json”);
//Send the HttpRequest
Task<HttpResponseMessage> response = httpClient.SendAsync(requestMessage);
//Wait till the Response Execution is complete
response.Wait();
//If the response is Successfully executed then it will return the value true
if (response.Result.IsSuccessStatusCode)
{
}
}
catch (Exception err)
{
throw new Exception(err.Message);
}
CRM Online
The key to establishing connection in CRM Online, is getting the authentication context and acquiring the token
        AuthenticationResult result = null;
        AuthenticationContext authContext;
In CRM Online, the OAuth authentication is performed through the Azure Active Directory. With OAuth the user is presented with the login page to type in the credentials manually, once the user is successfully authenticated, the control is redirected to the application that had invoked the authentication.
The following details are set in the config file for CRM Online connection
    <!-- FOR CRM Online-->
    <add key="EndPointType" value="OnlineFederation"/>
    <add key="Username" value="username@myorg.onmicrosoft.com"/>
    <add key="Password" value="password"/>
    <add key="ServerAddress" value="https://myorg.crm.dynamics.com"/>
    <add key="RedirectUrl" value="http://localhost/CrmWebApi"/>
    <add key="ClientId" value="3b12fde5-d0c1-4bed-b1c2-73b0f336d777"/>
    <!--CRM Online End-->
You need to pass the authority to the AuthContext
private void DiscoverAuthority(String serviceUri)
 {
            try
            {
                //Authentication parameters received from Resource Server
                AuthenticationParameters ap = AuthenticationParameters.CreateFromResourceUrlAsync(new Uri(serviceUri + "/api/data/")).Result;

                if (!String.IsNullOrEmpty(ap.Resource))
                {
                    _serviceUri = ap.Resource;
                }
                _authority = ap.Authority;
            }
            catch (HttpRequestException e)
            {
                throw new Exception("An HTTP request exception occurred during authority discovery.", e);
            }
        }
#region If you want to get the Authenticationresult at runtime by manually entering the username & password
// Authenticate the registered application with Azure Active Directory.
authContext = new AuthenticationContext(Authority, false);

//Result to get the AccessToken
result = authContext.AcquireToken(_serviceUri, _clientId, new Uri(_redirectUrl));
#endregion
If you see in the above code, we pass the
_serviceUri – CRM Online URL,
_clientId – the client id that is generated for your app when you register it in Azure.
_redirectUrl – The URL that the control should be redirected to once the user is successfully authenticated
We can also pass the credentials of a valid CRM user if we do not want the login prompt to show up.
#region Code to pass the Username & Password through Appconfig
//// Authenticate the registered application with Azure Active Directory.
authContext = new AuthenticationContext(Authority, false);

//User Credentials from the AppConfig
UserCredential cred = new UserCredential(_userName, _passWord);

////Result to get the AccessToken
result = authContext.AcquireToken(_serviceUri, _clientId, cred);
#endregion
Once you have the Authentication Result, you can prepare the HttpClient as below:
HttpClient httpClient= null;
httpClient = new HttpClient();
 //Default Request Headers needed to be added in the HttpClient Object
httpClient.DefaultRequestHeaders.Add("OData-MaxVersion", "4.0");
httpClient.DefaultRequestHeaders.Add("OData-Version", "4.0");
httpClient.DefaultRequestHeaders.Accept.Add(new System.Net.Http.Headers.MediaTypeWithQualityHeaderValue("application/json"));

 //Set the Authorization header with the Access Token received specifying the Credentials
 httpClient.DefaultRequestHeaders.Authorization = new AuthenticationHeaderValue("Bearer", _result.AccessToken);
Steps for registering the App in Azure to get the ClientID:
For Online CRM deployment models, it seems to be a tricky process as we need to use OAuth to authenticate the user to Azure Active Directory and hence we need to register the App on Azure to get the ClientId & Redirect URL which will be used for Azure authentication.
Steps for registering the App in Azure:
If you have a trial online CRM then you also need to have an Azure subscription. You may get the trial account for Azure using the credentials for Office 365 by signing up from this link. Make sure to sign up in the same tenant.
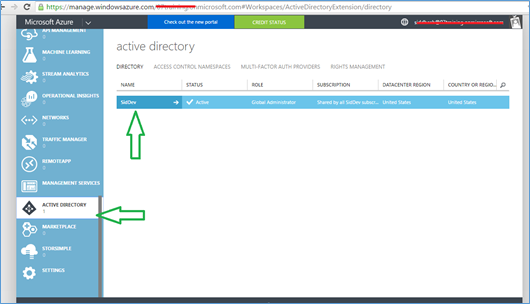
After you have signed up for Azure go to the Azure portal i.e. https://portal.azure.com/ and navigate to ‘Browse’ and click ‘Active Directory’. You are then directed to the page as shown in the screenshot below.
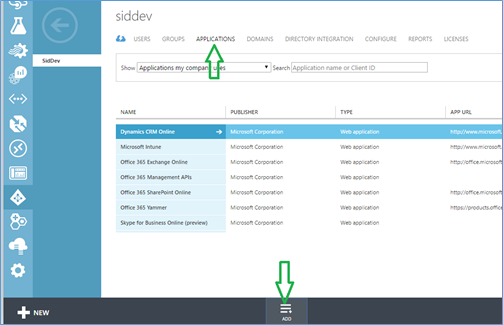
From the left-hand side after selecting ‘ACTIVE DIRECTORY’, you are able to find the Active Directory which is created for the Organization. Click and open the active directory.
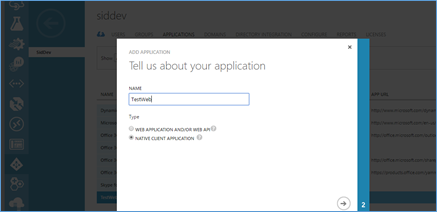
At the bottom click ‘ADD’ to add the application. A pop up would then get displayed on the screen.
Give a name for the App and select ‘NATIVE CLIENT APPLICATION’ and proceed to the next step.
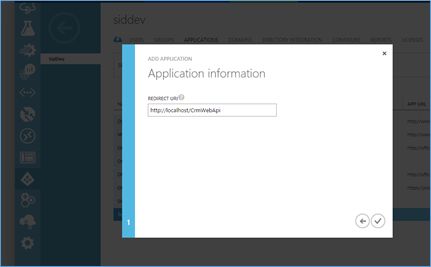
You then need to specify the Redirect Url which can be used in the Code later as above.
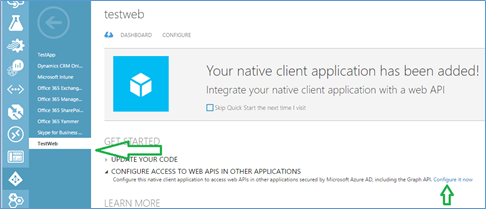
Your App as seen in the screenshot below is now ready.
Next, click ‘CONFIGURE ACCESS TO WEB APIS IN OTHER APPLICATIONS’ followed by ‘Configure it Now’
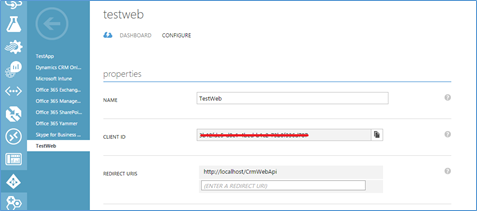
You will then get directed to the screen as shown below:
Here you can see the Client ID and Redirect URL which needs to be used in the code further.
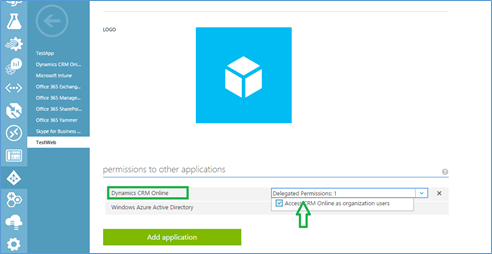
As you scroll down, you can view the web page as shown below.
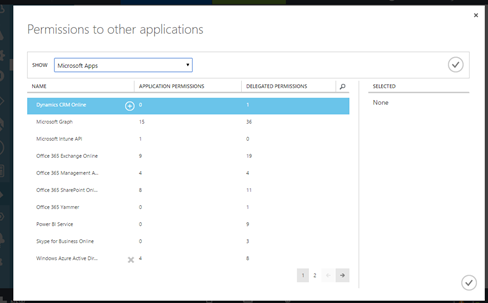
After clicking ‘Add application’ you would be directed to a screen which displays the list of Microsoft Apps.
Select the Dynamics CRM Online option and add it. Next, the screenshot as below lets you provide the access to the user you wish.
Conclusion:
Hope the above code snippets along with the logic helps you to perform various operations through the Web API using C#. We have referred to the blog posted under Microsoft’s Developer Network for creating our WebApiHandler class.
Cut short 90% of your manual work and repetitive data entry!
Get 1 Click apps and say goodbye to all repetitive data entry in CRM –
Click2Clone – Clone/Copy Dynamics 365 CRM records in 1 Click
Click2Export – Export Dynamics 365 CRM Report/CRM Views/Word/Excel template in 1 Click
Click2Undo – Undo & Restore Dynamics 365 CRM data in 1 Click

Well, I didn’t get the poing actually. Why would I use all those code, if I could generate my service using only 3 lines of code?
With the IOrganizationService in hands I could call any message I wish to. (Create, Update, Delete and so on).
Traditionally we had been provided SOAP and ODATA endpoints. Using IorganizationService you can still continue to connect to CRM. WEB API is the next update for the ODATA endpoint. The earlier ODATA version only supported CRUD operations and for special messages of CRM that are beyond the CRUD messages, we had to go with SOAP service. With ODATA v4 (WEB API endpoint) it is now possible to execute messages in addition to the CRUD operations.
The WEB API has been made available for development of external programs that connect with CRM like portals.
The blog explains how to make connection from external apps using server-side code with C#
Very great post. I just stumbled upon your weblog and wished to mention that I have
truly enjoyed surfing around your weblog posts.
In any case I will be subscribing for your
rss feed and I’m hoping you write once more very soon!